
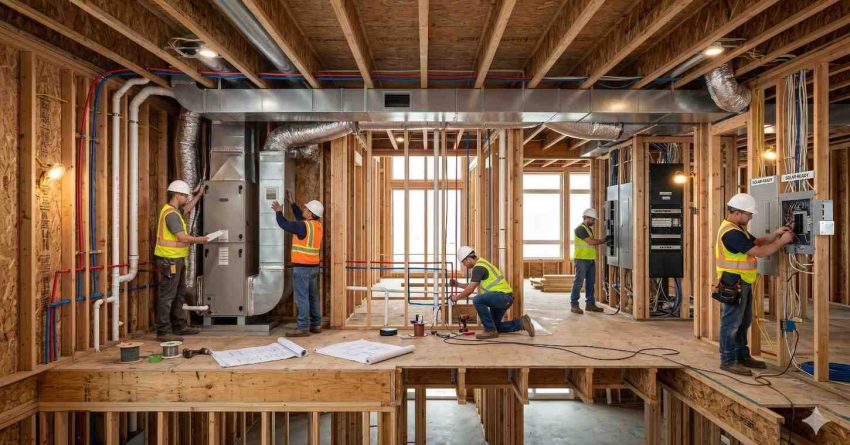
HVAC, plumbing, and electrical systems — collectively known as MEP systems — form the mechanical backbone of every new home, controlling how it heats, cools, moves water, handles waste, and delivers power to every circuit and fixture.
Getting these systems right during construction prevents costly retrofits after move-in, cuts annual energy waste by thousands of dollars, and directly shapes indoor comfort, air quality, and long-term property value.
This guide covers HVAC sizing, plumbing systems, electrical service, water heating, ventilation, septic, wells, gas choices, smart MEP integration, system costs, climate design, rough-in inspections, common problems, and contractor selection.
What Are MEP Systems in New Home Construction?
MEP stands for Mechanical, Electrical, and Plumbing — the three trade disciplines responsible for every system inside a new home that you cannot see but cannot live without. They represent some of the most expensive and consequential decisions in new construction, and yet they are frequently finalized under timeline pressure with insufficient planning.
Mechanical systems (the “M” in MEP) include HVAC — heating, ventilation, and air conditioning — along with specialty systems such as whole-house humidifiers, energy recovery ventilators, and radiant heating. Mechanical systems determine thermal comfort, indoor air quality, and a significant portion of the home’s ongoing energy cost.
Plumbing systems (the “P”) include the supply system that delivers pressurized hot and cold water to every fixture, the drain-waste-vent (DWV) system that removes wastewater and prevents sewer gas entry, and gas supply piping where applicable. Plumbing decisions made during framing determine pipe material durability, water delivery speed, and serviceability for decades.
Electrical systems (the “E”) include the service entrance and main panel, all branch circuit wiring, outlets, switches, fixtures, and increasingly important dedicated circuits for EV chargers, solar interconnection, and smart electrical panels.
All three disciplines have a narrow window in the construction timeline — the rough-in phase — during which pipes, wires, and ducts get installed inside walls, floors, and ceilings before drywall goes up. Changes made after that window are expensive. Planning before it opens is everything.
MEP rough-in represents one of the most consequential milestones in new construction — our complete home building process step by step guide maps every phase from site work to certificate of occupancy, showing exactly when mechanical, electrical, and plumbing work begins, what rough-in inspections cover, and where the most common delays occur.
HVAC Systems for New Builds
HVAC is the single most complex MEP discipline in residential new construction. It involves equipment selection, load calculations, duct design, refrigerant systems, combustion safety, ventilation, and humidity control — all of which must work together as an integrated system to deliver comfort and efficiency.
Furnace vs Heat Pump: The Foundational Choice
Every new home requires a decision about whether to use a gas-fired furnace for heating or an electric heat pump. Heat pumps use refrigerant to move heat rather than generate it, making them two to four times more energy-efficient than resistance heating and competitive with gas in many climates.
Modern cold-climate heat pumps operate effectively down to -15°F or lower, making them viable across most of the continental United States. In climate zones with cold winters and moderate electricity rates, a dual-fuel heat pump system — using the heat pump for moderate temperatures and a gas furnace for extreme cold — often delivers the best combination of efficiency and low operating cost.
The choice between a gas furnace and an electric heat pump is the single most consequential HVAC decision in new construction, affecting operating cost, comfort, and environmental impact for the life of the home — our dedicated furnace vs heat pump for new builds guide walks through efficiency ratings, climate-zone performance data, upfront vs lifecycle cost comparisons, and when a hybrid dual-fuel system delivers the best economics.
Forced Air vs Hydronic Heating
Forced air systems distribute conditioned air through ductwork and are the most common HVAC approach in US residential construction. They are cost-effective to install, allow cooling through the same duct system, and support whole-house filtration and humidification equipment.
Hydronic systems circulate heated water through pipes to radiators, baseboard units, or in-floor radiant tubing. Radiant floor heating delivers exceptional comfort — heating from the floor up with even temperature distribution — but adds installation cost and requires careful coordination with flooring finish selections.
Radiant floor heating is one of the fastest-growing premium upgrades in new construction — our radiant floor heating guide for new construction explains hydronic vs electric radiant options, installation cost by system type, floor material compatibility, and which zones in a home benefit most from in-floor heat.
Ductwork Design and Sizing
Duct design is one of the most commonly neglected aspects of new-home HVAC — and one of the most consequential. Undersized ducts restrict airflow and strain equipment. Poorly routed ducts located in unconditioned attic spaces can lose 20-30% of conditioned air through conduction and leakage, making an otherwise efficient system wildly inefficient.
The correct approach involves a Manual D duct design — a formal calculation that sizes every duct section based on airflow requirements derived from the Manual J load calculation. Builders who skip this step and estimate duct sizing are setting you up for comfort complaints. Demand a Manual D from your HVAC contractor before rough-in begins.
Duct layout and sizing are among the most commonly neglected elements of new-home HVAC — and among the most consequential for long-term comfort and efficiency — which is why our ductwork design best practices guide covers Manual D methodology, trunk-and-branch vs radial layouts, duct sealing requirements under IECC, and the installation mistakes most likely to cause comfort complaints at move-in.
Zoned HVAC and Mini-Split Systems
Zoned HVAC divides your home into multiple independently controlled areas, allowing each zone to be heated or cooled to different setpoints. Multi-zone mini-split systems — ductless or ducted — achieve this without traditional ductwork by running individual refrigerant lines from an outdoor unit to multiple indoor air handlers.
Mini-splits offer zone-level efficiency, quieter operation, and installation flexibility that ducted systems cannot match. They are increasingly popular for entire homes in moderate climates, home additions, and garage or workshop spaces.
Equipment Sizing: Why Manual J Is Non-Negotiable
Every piece of HVAC equipment must be sized to the actual heat load of your home — calculated using the ACCA Manual J protocol. Oversizing leads to short-cycling, excessive humidity, comfort complaints, and premature equipment failure. Undersizing leaves the home cold in winter and hot in summer. Both outcomes are expensive and avoidable.
Manual J accounts for climate zone, building envelope insulation levels, window area and orientation, infiltration rate, occupancy, and internal heat gains — variables that vary enormously from home to home, which is why rule-of-thumb sizing (“one ton per 600 square feet”) produces consistently poor results.
Selecting the right system type is only half the equation — correctly sizing every piece of equipment to your home’s actual heat load using Manual J calculations is what separates a comfortable, efficient home from one that short-cycles, struggles with humidity, or fails prematurely, which is why our HVAC sizing guide for new construction covers load calculation methodology, equipment selection criteria, and the contractor questions to ask before any order is placed.
Plumbing Systems for New Construction
Plumbing in a new home encompasses three interconnected systems: the supply system that delivers pressurized hot and cold water to every fixture; the drain-waste-vent (DWV) system that removes wastewater; and, where applicable, gas supply piping. Decisions made during framing determine how each system performs for the full life of the home.
Pipe Material Choices: PEX, Copper, and CPVC
Three pipe materials dominate residential new construction in the US, each with distinct performance characteristics:
PEX (cross-linked polyethylene) has become the dominant supply pipe material in most regions. It is flexible, significantly freeze-resistant (expanding rather than splitting in freezing temperatures), faster to install than rigid pipe, and considerably less expensive than copper. PEX-A, manufactured using the Engel method, offers the greatest flexibility and freeze tolerance.
Copper has served as the standard for residential supply piping for decades. It is durable, antimicrobial, and chemically stable in most water conditions. Its drawbacks include higher material and labor cost, susceptibility to freeze damage compared to PEX, and the need for skilled soldering or press-fitting installation.
CPVC (chlorinated PVC) is a rigid plastic alternative to copper — affordable, easy to work with, and code-approved in most jurisdictions. It is more common in regions with historically high copper prices or where local water chemistry is corrosive to metal pipe.
Your pipe material affects installation cost, freeze vulnerability, water quality, system longevity, and even the sound your pipes make — our detailed PEX vs copper plumbing comparison breaks down every performance dimension of all three materials across climate zones, water chemistry types, and build scenarios so you can make an informed specification before rough-in begins.
Manifold vs Trunk-and-Branch Layout
The manifold home-run system routes individual PEX lines from a central manifold directly to each fixture — rather than branching off a main trunk line. This approach improves hot water delivery speed, allows individual fixture shutoffs at the manifold for easy servicing, and creates better pressure balance throughout the system.
The traditional trunk-and-branch layout uses a main supply line with tee fittings branching to each area, then to individual fixtures. It requires less pipe material but delivers less predictable pressure balance and is more difficult to troubleshoot or service.
The manifold home-run plumbing layout — where individual PEX lines run directly from a central manifold to each fixture — offers significant advantages in serviceability, hot water delivery speed, and leak isolation compared to traditional trunk-and-branch systems, which our manifold home run plumbing guide explains in full detail including design principles, cost comparison, and when the upgrade is worth specifying in a new build.
Drainage and Vent Stack Design
DWV systems rely on gravity to move wastewater from fixtures to the sewer or septic system, with vent pipes extending through the roof to prevent P-trap siphoning and allow air into the drain system. Vent design is governed by the IPC (International Plumbing Code) or UPC depending on jurisdiction.
Common errors in new-construction DWV design include undersized drain lines, improperly pitched horizontal runs (code standard is 1/4 inch per linear foot), and wet venting configurations that do not comply with local code adoption. Each of these creates slow drainage, noisy pipes, or recurring clogs — problems that are expensive to fix after walls close.
Electrical Systems for New Builds
Electrical planning for a new home involves far more than choosing outlet locations. Service sizing, panel configuration, circuit layout, code compliance, and future-proofing for EV charging, solar, and smart systems all require decisions during design that are expensive or impossible to reverse after construction completes.
Service Panel Sizing: 200A vs 400A
Most US new homes are served by a 200-amp residential service — adequate for traditional gas-hybrid homes where the HVAC, water heater, and cooking appliances are gas-fueled. All-electric homes, however, can approach or exceed 200A capacity, particularly where multiple EV chargers, electric heat pumps, and electric water heating operate simultaneously.
A 400-amp service provides substantial headroom for future loads but adds approximately $2,000-5,000 to construction cost. In many cases, a 200A main panel combined with a strategically placed subpanel in the garage delivers sufficient capacity at lower cost while preserving future upgrade flexibility.
If you’re designing an all-electric home, planning EV charging stations, or preparing for solar and battery storage, the difference between a 200-amp and a 400-amp main service panel is enormous — and upgrading after construction typically costs $3,000-8,000 more than specifying correctly upfront, which is why our guide to 200A vs 400A electrical service covers every load calculation factor and future-proofing consideration before you finalize your electrical plans.
Subpanels and Circuit Planning
Large homes benefit from subpanels that reduce wire runs to distant areas. A garage subpanel serves EV chargers, workshop circuits, and exterior outlets without requiring large conductors to run the full length of the home. A basement subpanel serves workshop, utility, and mechanical room circuits independently.
Circuit planning should account for: dedicated circuits for large appliances (refrigerator, microwave, dishwasher, disposal, and washing machine); individual circuits for each bathroom; separate circuits for HVAC equipment; and dedicated high-amperage circuits for EV charging and electric cooking ranges.
Pre-wiring your garage for an EV charger during construction costs as little as $200-400 in conduit and wire, compared to $1,500-3,000 for a post-drywall retrofit — our guide to EV charger pre-wiring for new builds explains dedicated circuit requirements, Level 2 charger amperage options, and how to future-proof the garage panel for multiple vehicles from day one.
GFCI and AFCI Code Requirements
The 2020 NEC (National Electrical Code), now adopted by most US jurisdictions, requires GFCI protection in kitchens, bathrooms, garages, all outdoor locations, unfinished basements, and any area near water. It requires AFCI protection on virtually all 15A and 20A circuits in living areas, bedrooms, kitchens, laundry rooms, and dining rooms. NEC 2020 Section 230.67 additionally mandates whole-house surge protective devices on new service installations.
These requirements add modest cost but prevent electrical fires and electrocution hazards. Verify that your builder’s electrical subcontractor is working from the current adopted code edition for your jurisdiction — many areas still operate under 2017 or earlier NEC versions with different AFCI coverage requirements.
Our whole-house surge protection guide for new construction covers NEC 2020 surge protection requirements, SPD selection criteria, and why whole-house surge protection is especially important in homes with smart panels, EV chargers, and sensitive electronics.
Future-Proofing for EV, Solar, and Smart Panels
New construction is the ideal time to install conduit runs and junction boxes for rooftop solar, even if panels are not purchased at move-in. A solar-ready installation typically adds $200-600 to electrical rough-in cost while eliminating the need for future roof penetrations and conduit fishing through finished attic spaces.
Next-generation smart electrical panels — from manufacturers such as Span, Lumin, and Schneider Electric — replace traditional load centers with software-controlled circuit breakers that allow individual circuit monitoring, remote control, and integration with solar and battery storage systems. Specifying conduit and communication wiring for a smart panel during construction is a low-cost investment with significant long-term value.
Getting your service size, panel configuration, and circuit layout right requires calculating your total connected load across HVAC, water heating, appliances, EV charging, and smart devices — and our comprehensive electrical service sizing guide walks through the complete NEC load calculation process, explains when a second subpanel makes more sense than upsizing the main, and identifies the most common electrical planning mistakes in new construction.
Water Heating for New Homes
According to the U.S. Department of Energy, water heating represents 14-18% of a typical household’s energy use — making it the second-largest energy expense after space conditioning in most homes. The water heating system you specify during construction will operate for 10-20+ years, so lifecycle cost matters far more than purchase price alone.
Tank, Tankless, and Heat Pump Water Heaters
Tank water heaters maintain a stored volume of water (typically 40-80 gallons) at setpoint temperature continuously. They are the least expensive to purchase and install but the least efficient — especially in unconditioned spaces like cold garages where standby heat losses are highest.
Tankless (on-demand) water heaters heat water only when needed, eliminating standby losses entirely. Gas tankless units deliver high flow rates but require proper gas line sizing and sealed combustion venting. Electric tankless units require very high amperage (often 150A+ for whole-house units) and can strain electrical service.
Heat pump water heaters extract heat from surrounding air using a refrigerant cycle, making them two to three times more efficient than electric resistance tank models. They require adequate surrounding air space (typically 700-1,000 cubic feet minimum), produce modest cooling and dehumidification as a byproduct, and qualify for significant federal tax credits.
Heat pump water heaters extract heat from ambient air rather than using electric resistance elements, making them two to three times more efficient than standard electric tank models — and they qualify for substantial federal tax credits under the Inflation Reduction Act, making them one of the highest-ROI upgrades available in new construction, as our heat pump water heater for new builds guide demonstrates with real cost-of-ownership numbers.
Hot Water Distribution Design
The distance between your water heater and your most distant fixture determines how long you wait for hot water — and how much water you waste while waiting. In larger homes, a master bathroom several hundred feet of pipe from a basement mechanical room can result in 30-45 seconds of cold water before hot arrives.
Strategies to address this include: locating the water heater centrally near high-demand fixtures; installing a structured PEX manifold with appropriately sized branch lines; or adding a recirculating pump system — either with a dedicated return line or a point-of-use pump at the furthest fixture.
Choosing between a tank, tankless, and heat pump water heater involves comparing upfront cost, operating cost, hot water delivery speed, recovery rate, and lifespan — our master tankless vs tank vs heat pump water heater comparison provides real cost-of-ownership data for each technology over both a 10- and 20-year horizon so you can make a genuinely informed specification decision.
Mechanical Ventilation: ERV, HRV, and Range Hoods
Energy-efficient new homes built to tight building envelope standards — with blower door readings below 3 ACH50 — cannot rely on incidental air infiltration for fresh air exchange. They require controlled mechanical ventilation to maintain healthy indoor air quality without sacrificing the energy efficiency that tight construction delivers.
Why Tight Homes Require Mechanical Ventilation
ASHRAE 62.2, the residential ventilation standard referenced by most building codes, establishes minimum whole-building ventilation rates that must be met continuously in new construction. In a tight home, meeting those rates requires dedicated ventilation equipment operating on a controlled schedule.
Insufficient ventilation in tight homes results in elevated CO2 concentrations that cause drowsiness and cognitive impairment, accumulated indoor moisture that promotes mold, and elevated concentrations of VOCs from building materials and furnishings. Proper mechanical ventilation is not optional in high-performance new construction — it is the system that makes tight construction safe and comfortable.
ERV vs HRV: Which Does Your Climate Need?
Both ERVs and HRVs recover energy from outgoing exhaust air and transfer it to incoming fresh air, dramatically reducing the energy penalty of ventilation. The critical distinction: an ERV transfers both heat and moisture, while an HRV transfers heat only.
ERVs are preferred in hot-humid climates (where they remove moisture from incoming summer air) and in cold-dry climates (where they retain indoor moisture during dry heating seasons). HRVs are preferred in cold-humid climates where indoor moisture during heating season is already elevated and moisture transfer from outdoors would compound the problem.
Choosing between an energy recovery ventilator and a heat recovery ventilator comes down primarily to climate — ERVs transfer both heat and moisture and suit humid and cold-dry climates, while HRVs transfer heat only and serve cold climates where indoor moisture is already high — and our ERV vs HRV selection guide covers the full climate-zone decision framework, sizing methodology, and ductwork integration requirements.
Kitchen Range Hoods and Makeup Air
Kitchen range hoods create a special challenge in tight new-construction homes. Exhaust volumes above 400 CFM — common with high-BTU professional ranges — create negative pressure in the home that causes backdrafting in combustion appliances, strains HVAC systems, and makes exterior doors difficult to open.
Most jurisdictions now require makeup air systems for range hoods exceeding 400 CFM, meaning a dedicated outdoor air supply unit must be specified alongside the range hood at the design stage.
Range hoods exceeding 400 CFM require dedicated makeup air systems in most code jurisdictions — and high-BTU professional ranges can demand 600-1,200 CFM of exhaust, creating pressure imbalances that affect combustion appliances, HVAC performance, and even door operation — which is exactly what our kitchen range hood and makeup air guide addresses with CFM requirements, code thresholds, and specification guidance for every kitchen configuration.
Sewer, Septic, and Waste Systems
Every new home generates wastewater that must be safely conveyed to either a municipal sewer system or an on-site septic system. Which option is available depends entirely on your lot location, and the difference has major implications for permitting, construction cost, and long-term maintenance obligations.
Municipal Sewer vs Private Septic
Municipal sewer connection is simpler to permit and easier to maintain — you pay a one-time connection fee and ongoing monthly service charges, and the utility manages the downstream treatment infrastructure. Sewer connection fees vary enormously by jurisdiction, ranging from a few thousand dollars to $20,000 or more in capacity-constrained urban systems.
Private septic systems are required on lots without sewer access — common on rural acreage, larger suburban lots in areas without sewer infrastructure, and remote properties. Septic systems must be engineered, permitted, and inspected by local health authorities, with design driven by site-specific soil percolation tests.
Septic System Types for New Construction
The type of septic system appropriate for your lot depends on soil percolation rate, groundwater depth, available lot area, setback requirements from wells and property lines, and local health regulations:
Conventional gravity-fed systems use a septic tank for primary treatment and a drainfield for secondary treatment through soil absorption. They are the least expensive option where soil conditions permit adequate percolation.
Aerobic treatment units (ATUs) introduce oxygen to accelerate bacterial digestion, producing cleaner effluent suitable for smaller drainfields or sites with poor native soil percolation. They require electricity and more regular maintenance than conventional systems.
Mound systems elevate the drainfield above grade when high groundwater or shallow soil depth prevents in-ground absorption. They cost more than conventional systems but are approved in many areas where conventional designs fail perc testing.
Drip irrigation systems distribute pre-treated effluent through small-diameter emitters, enabling installation on challenging lots with limited footprint or difficult soil profiles.
Building on a lot without municipal sewer access requires a permit-ready septic system designed around your soil’s percolation rate, bedroom count, setback requirements, and local health department regulations — and our septic system design for new builds covers every system type from conventional gravity-fed to aerobic to mound systems, along with perc test interpretation and the jurisdiction-specific approval process.
Well and Water Supply for New Construction
Rural and semi-rural new construction frequently requires a private well to supply domestic water. Well drilling is a complex, location-specific undertaking involving geology, state and county permitting, pump engineering, and water quality testing that differs significantly from municipal water service.
Drilling a Well: Cost and Process Overview
The cost to drill a residential water well depends on the required depth to reach an adequate and potable aquifer, local geology (hard rock requires more drilling time than sedimentary formations), casing material and length, and regional labor rates. National cost estimates range from $5,000 to $20,000+ for a complete drilled well system, with deep wells in granite bedrock terrain sometimes exceeding $25,000.
The process involves site assessment and hydrogeological evaluation, permit applications to the state water agency and county health department, drilling by a licensed well contractor, well development and yield testing (measuring gallons-per-minute over a sustained period), submersible pump installation, pressure tank sizing and installation, and comprehensive water quality testing.
Pressure Tanks and Pump Systems
Well systems require a properly sized pressure tank to maintain consistent water pressure between pump cycles and protect the pump motor from short-cycling wear. Pressure tank sizing depends on pump flow rate, household water demand, and target cycle frequency — undersized tanks allow the pump to cycle dozens of times per hour, rapidly degrading the motor.
Submersible pump selection requires matching pump capacity to confirmed well yield, pipe diameter, static water level, and required delivery pressure. A pump oversized relative to well yield will draw the well down and run dry, causing rapid pump failure.
Drilling a well for a new home involves hydrogeological site assessment, state and county permitting, casing selection, pump sizing, pressure tank specification, and water quality testing — with costs ranging from $5,000 to $20,000+ depending on depth and local geology — and our complete guide to drilling a well for a new home walks through every decision and cost variable so you know what to expect and how to evaluate well-drilling contractors effectively.
Gas Systems: Natural Gas, Propane, and All-Electric Options
The decision about whether to connect your new home to natural gas, use propane from a tank, or design a fully electric home affects every fuel-burning appliance and MEP system in the building. It also shapes your energy costs, maintenance profile, and alignment with state and local electrification regulations for decades.
Natural Gas vs Propane for New Builds
Natural gas is available via utility infrastructure in most suburban areas and many rural regions. Where available, it offers the lowest per-BTU fuel cost of any combustion fuel and a well-established appliance ecosystem for heating, water heating, cooking, and backup generation. The fundamental limitation: if natural gas infrastructure does not reach your specific lot, it simply is not an option.
Propane is available everywhere via bulk delivery and on-site storage tanks (typically 500-1,000 gallon tanks buried or surface-mounted). Propane contains approximately 2.5x the energy density of natural gas by volume, requiring slightly different appliance orifice configurations. Operating cost is higher than natural gas but typically lower than all-electric heating in cold climates without heat pump efficiency.
The All-Electric New Home
All-electric construction eliminates gas piping entirely and routes all energy through the electrical panel. Combined with high-efficiency heat pumps for space conditioning and heat pump water heaters for domestic hot water, all-electric homes can match or beat gas homes on operating cost while qualifying for federal tax credits under the Inflation Reduction Act and future-proofing against natural gas price volatility.
California, Washington, New York, and a growing number of cities and counties are implementing all-electric requirements for new residential construction. Many utilities offer financial incentives for electric-ready construction. The all-electric approach requires appropriate electrical service sizing and may benefit from a smart panel capable of intelligent load management.
Whether to build around natural gas, propane, or a fully electric system affects every MEP discipline in your home — from HVAC equipment selection to water heater type to appliance options — with long-term implications for operating cost, resale value, and alignment with local electrification mandates, all of which our master natural gas vs propane vs all-electric comparison examines with real utility cost data by region.
Smart MEP Integration for New Builds
New construction is the optimal opportunity to integrate smart control into your MEP systems at minimal incremental cost. Running conduit, installing communication wiring, and specifying smart-capable equipment during rough-in eliminates the retrofit labor — and wall and ceiling damage — that makes post-construction smart upgrades so expensive.
Smart Thermostats and Multi-Zone HVAC Control
Smart thermostats are nearly universal in new construction today, but true multi-zone smart HVAC systems — with separate thermostats and motorized dampers for different home areas — represent a meaningful upgrade in both comfort and energy efficiency. Installing zone control dampers and wiring during construction adds relatively little cost when walls are open and ductwork is being installed.
Geofencing-based HVAC automation, which adjusts temperature setpoints based on household occupancy status, can reduce HVAC energy consumption by 10-15% in typical households with minimal behavior change required from occupants.
Smart Water Shutoff and Leak Detection
Whole-home smart water shutoff valves — installed on the main supply line during plumbing rough-in — allow remote shutoff via mobile app, automatic shutoff triggered by networked leak sensors, and integration with major smart home platforms. When specified during construction before finished flooring and trim make plumbing access difficult, these valves cost very little to install.
Wireless leak sensors placed at water heaters, under sink cabinets, near washing machines and dishwashers, and in mechanical rooms provide early warning of supply and drain leaks before they cause significant water damage — which ranks among the most frequent and expensive homeowner insurance claims in the US.
Smart Electrical Panels and Energy Monitoring
Next-generation smart electrical panels replace conventional load centers with software-controlled circuit breakers enabling individual circuit monitoring and control from a smartphone. They are particularly valuable in homes with solar production, battery storage, and EV charging — enabling intelligent load management that maximizes solar self-consumption, avoids demand charges, and automatically sheds non-critical loads during grid outages.
Integrating your HVAC, plumbing, and electrical systems with smart home technology during construction — when walls are open and conduit runs are essentially free — dramatically expands what those systems can do while eliminating the cost and disruption of retrofit work, and our comprehensive smart home integration for new construction guide covers every MEP system worth wiring for smart control, from multi-zone thermostats to whole-house water shutoffs to smart electrical panels.
MEP Costs in New Construction
MEP systems collectively represent 18-25% of total new home construction cost — one of the largest budget categories after framing, roofing, and site work. Understanding realistic cost ranges helps you allocate budget accurately and evaluate subcontractor bids with confidence.
Typical HVAC Installation Cost Range
HVAC installation in a new single-family home — including all equipment, ductwork, controls, and labor — typically runs:
- Small homes (under 1,500 sqft): $8,000-$14,000
- Medium homes (1,500-2,500 sqft): $12,000-$22,000
- Larger homes (2,500-4,000 sqft): $18,000-$35,000
- High-performance or complex systems: $30,000-$60,000+
Variables that push cost upward include high-efficiency variable-speed equipment, multi-zone systems, geothermal heat pumps, radiant floor heating, ERV/HRV ventilation, whole-house dehumidifiers, and homes with challenging duct routing geometry.
Plumbing Rough-In and Fixture Cost Range
Plumbing in a new home typically includes rough-in labor and materials, fixture trim-out, water heater, and any specialty systems such as whole-house water softeners or filtration:
- Basic 3-4 bath home: $12,000-$22,000
- Larger or more complex homes: $18,000-$35,000
Septic systems and well systems are separate line items: conventional septic runs $3,500-$10,000 installed; well systems run $5,000-$20,000+ depending on depth, geology, and pump selection.
Electrical Service and Wiring Cost Range
Electrical rough-in, service entrance, panel, and trim-out for a new home:
- Standard 2,000-3,000 sqft home: $12,000-$22,000
- Larger homes or smart/EV-ready builds: $18,000-$40,000
Upgrades that increase electrical budget include: 400A service, smart panel specification, multiple EV charging circuits, solar interconnection pre-wiring, structured wiring panel, whole-house surge protection, and generator transfer switch.
MEP systems typically represent 18-25% of total new home construction costs and are among the largest budget line items after framing and roofing — our new construction cost breakdown covers every cost category in a typical new build with regional benchmarks, explains the difference between hard costs and soft costs, and provides MEP-specific line item data you need to evaluate contractor bids accurately.
Climate-Specific MEP Design Considerations
MEP systems that perform brilliantly in Phoenix fail in Minnesota — and vice versa. Climate adaptation is not an optional upgrade; it is a fundamental design requirement affecting equipment selection, pipe routing strategy, insulation approaches, and ventilation system design from the earliest stages of planning.
Cold climates (IECC Zones 5-8) demand freeze-resistant pipe routing that keeps supply plumbing on interior walls or in conditioned spaces; cold-climate heat pumps with low-ambient performance ratings down to -15°F; larger water heating capacity to compensate for cold incoming water temperatures; frost-proof exterior hose bibs on all exterior spigots; and robust mechanical ventilation sized to manage elevated indoor moisture accumulation during long heating seasons.
Hot-humid climates (Zones 1-2) require significant latent (moisture) cooling capacity built into HVAC equipment sizing; ERV systems rather than HRVs to manage summer moisture loads; and careful HVAC equipment positioning to minimize condensation risk on ductwork in high-dewpoint environments.
Hot-dry climates (Zones 2-3, inland) benefit from: high-SEER cooling equipment for long cooling seasons; plumbing systems designed for high mineral-content water that accelerates water heater anode rod depletion; and careful solar-oriented panel placement for electrical systems supporting solar and battery storage.
Marine climates (Pacific Northwest) benefit from highly efficient ducted heat pumps that perform exceptionally well across moderate temperature ranges; careful vapor barrier design given year-round humidity; and seismic bracing for gas line connections and water heaters required by local building codes.
Cold-climate new construction demands fundamentally different MEP strategies — from pipe routing that keeps supply plumbing inside conditioned walls to cold-climate heat pumps rated for operation at -15°F or lower to frost-proof hose bib placement — and our cold climate MEP design guide covers every system-specific adaptation required in IECC climate zones 5, 6, 7, and 8.
The MEP Rough-In Phase and Inspections
The rough-in phase is the window during construction when all MEP systems are installed inside the walls, floors, and ceilings — after framing is complete and before insulation and drywall enclose everything. This is the last affordable moment to make changes to pipe runs, duct routes, and wire paths.
What Happens During MEP Rough-In
Plumbing rough-in comes first in most projects: supply and DWV pipes are installed throughout the framing structure, stubs are left protruding for each fixture location, and pressure tests are conducted to verify leak-free connections under operating pressure. Most jurisdictions require a plumbing rough-in inspection by the building department before walls close.
Electrical rough-in follows: the service entrance is connected, the main panel is roughed in and identified, and all branch circuit wiring is run to every outlet, switch, fixture, and appliance location. AFCI and GFCI circuit protection is configured, and low-voltage wiring for data, security, AV, and smart systems runs concurrently.
Mechanical rough-in includes ductwork installation and mastic sealing, equipment pads and structural supports, refrigerant line sets, thermostat and control wiring runs, and gas piping installation where applicable. Most IECC-compliant jurisdictions now require duct leakage testing at rough-in.
Rough-In Inspections and Pre-Drywall Walkthrough
Each MEP discipline requires a municipal rough-in inspection before insulation and drywall can proceed. The building official verifies compliance with the adopted code edition for the jurisdiction. Failing a rough-in inspection means re-inspection, project delay, and potential rework cost.
Beyond the municipal inspection, a personal pre-drywall walkthrough with your builder is your quality audit — the moment to verify outlet locations match your approved plans, confirm duct routing in critical ceiling and wall areas, and document any deviations from design intent before they are covered permanently.
The rough-in phase is your last affordable opportunity to make changes to any MEP layout before drywall closes the walls — and knowing exactly what each trade does, in what sequence, and what inspectors verify at each rough-in inspection is essential for catching problems before they become expensive post-drywall fixes, which our MEP rough-in phase walkthrough covers with inspector checklists for all three trades.
Common MEP Problems in New Builds
Even well-built homes experience MEP issues in the first years of occupancy. Knowing which problems are most common — and what causes them — helps you catch them early and address them under warranty before they escalate.
HVAC short-cycling — the system running in brief bursts rather than long, efficient cycles — is almost always caused by oversized equipment. An oversized system reaches setpoint too quickly, fails to adequately dehumidify before cutting off, and stresses the compressor through excessive start/stop cycles. The solution is proper Manual J-based sizing at design, not oversizing “for safety.”
Uneven room temperatures typically result from duct design deficiencies: rooms that are undersupplied relative to their heat load, duct runs in unconditioned attic spaces losing 20-30% of conditioning, or missing return air pathways that create pressure imbalances between rooms.
Plumbing water hammer — the banging that occurs when a valve closes quickly — results from absent air chambers or hammer arrestors at washing machines, dishwashers, and other quick-closing solenoid valves. This is a rough-in design specification issue, not a warranty defect, but it is correctable with arresting devices.
Slow hot water delivery at distant fixtures is a supply line length and routing issue, not a water heater failure. The solution is a properly designed recirculating pump system — either with a dedicated return line installed during rough-in, or a point-of-use pump added at the furthest fixture.
GFCI and AFCI nuisance tripping in new homes sometimes results from load imbalances on shared circuits, sensitive electronics creating harmonic distortion, or installer errors creating inadvertent shared neutral conductors on multi-wire branch circuits.
Before accepting your new home, every MEP system needs to be tested, commissioned, and documented — and our new home MEP punch list provides a comprehensive item-by-item checklist for HVAC commissioning, plumbing pressure tests, electrical load testing, water heater startup, and smart system verification so nothing gets missed at final walkthrough.
Working With MEP Contractors
In most new construction projects, your general contractor selects and manages three separate MEP subcontractors — HVAC, plumbing, and electrical — on your behalf. Understanding how to evaluate those subs and hold them to quality standards gives you genuine confidence in the systems behind your walls.
Licensing and Insurance Requirements
All three MEP trades require specialized state licenses separate from a general contractor license. HVAC technicians need EPA Section 608 refrigerant handling certification in addition to state mechanical contractor licensing. Plumbers need state journeyman or master plumber licenses with progressive experience requirements. Electricians need state electrical contractor licensing with continuing education requirements tied to NEC adoption cycles.
Request current license copies for every MEP subcontractor before rough-in commences. Verify license status directly through your state’s licensing board website — a simple process that takes minutes and provides definitive confirmation. Unlicensed MEP work voids equipment warranties, creates insurance exposure, and can prevent certificate of occupancy issuance.
Evaluating MEP Subcontractor Quality
Strong MEP subcontractors demonstrate thorough familiarity with the current adopted building code in the jurisdiction, willingness to perform Manual J and Manual D calculations rather than guessing at equipment and duct sizing, clean recent inspection histories from the building department, and verifiable references from comparable new construction projects.
Ask your builder: “Who performs the Manual J load calculation for HVAC sizing?” and “What duct leakage test results have you achieved on recent projects under current IECC?” The quality and specificity of the answers reveals a great deal about your builder’s MEP standards and management rigor.
Your general contractor selects and manages MEP subcontractors on your behalf, but understanding how to evaluate those subs — their licenses, insurance, references, and workmanship standards — gives you real confidence in the systems behind your walls, and our guide to working with home builders and MEP subs covers the contractor selection process, how to verify licenses by trade, and what strong contract language looks like for MEP work.
Conclusion
HVAC, plumbing, and electrical systems are not optional upgrades — they are the functional infrastructure of every home, determining comfort, safety, energy efficiency, and long-term value.
Every MEP decision in the design phase shapes your home’s performance for decades, at a fraction of the cost of fixing mistakes after walls close.
Contact Mr. Local Services for MEP planning, contractor connections, and system specifications that ensure your new home performs reliably from move-in day.
Frequently Asked Questions
What does MEP stand for in new home construction?
MEP stands for Mechanical, Electrical, and Plumbing — the three trade disciplines responsible for a home’s HVAC systems, water supply and drainage, and all electrical circuits, outlets, and service infrastructure.
When does the MEP rough-in phase occur, and why does it matter?
The MEP rough-in phase occurs after framing is complete but before insulation and drywall, when all pipes, wires, and ducts are installed inside the structure. It’s your last affordable chance to make changes — relocating a duct or outlet after drywall costs 5-10x more than doing so during rough-in.
How much does HVAC typically cost in a new construction home?
HVAC installation in a typical new home runs $12,000-$25,000 for equipment, ductwork, controls, and labor, varying by home size, system type, and climate. High-efficiency multi-zone systems, geothermal heat pumps, and ERV/HRV ventilation add to this range.
What is the difference between an ERV and an HRV for new construction?
An ERV (energy recovery ventilator) transfers both heat and moisture between exhaust and incoming air streams, making it suited to humid and cold-dry climates. An HRV (heat recovery ventilator) transfers heat only and is preferred in cold-moist climates where retaining additional indoor moisture is undesirable.
Should I build with natural gas, propane, or design an all-electric home?
The right choice depends on gas availability at your lot, local utility rates, climate zone, and applicable state incentives or mandates. All-electric homes with heat pumps offer strong efficiency, federal tax credits, and future-proofing against gas price volatility; gas or propane may offer lower upfront costs and familiar appliance options where infrastructure exists.
How much electrical service does a new home need — 200A or 400A?
Most new homes use 200A service, which is sufficient for gas-hybrid construction. All-electric homes with EV charging, heat pump systems, and electric water heating should consider a 200A main panel with a strategic garage subpanel or a full 400A service — upgrading after construction typically costs $3,000-8,000 more than specifying correctly during initial build.
What is a Manual J calculation, and is it required for new construction?
A Manual J calculation is the ACCA-standard methodology for determining a home’s actual heating and cooling load based on climate, building envelope, square footage, window area, orientation, and occupancy. It is required by the IECC energy code in most US jurisdictions and is the only reliable basis for correct HVAC equipment sizing.