
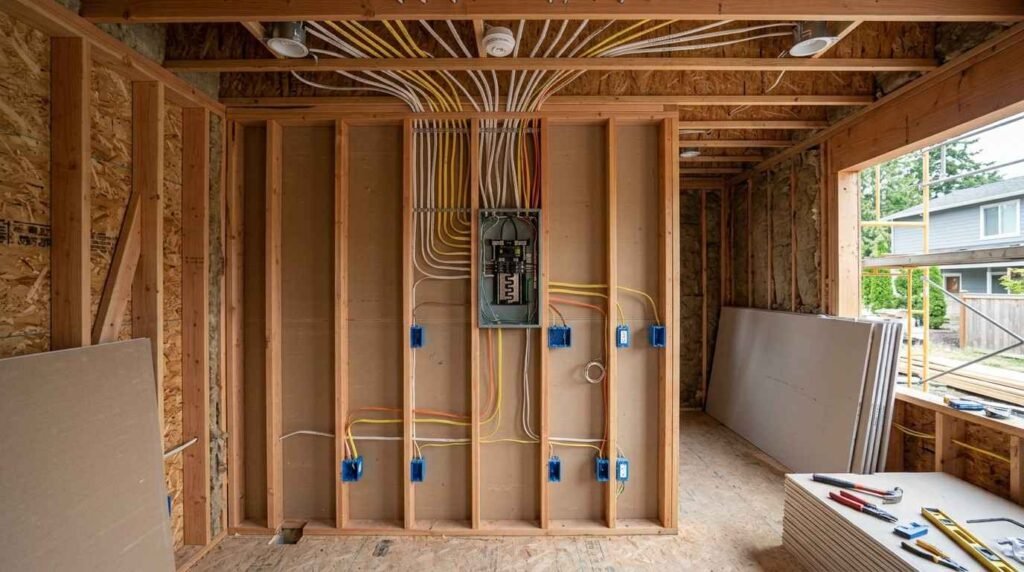
Electrical system design for ADUs is the planning process that determines how power reaches an accessory dwelling unit, how much capacity it needs, and how every circuit inside it gets protected. I treat it as the backbone of the whole build, because it touches permits, comfort, and resale value.
Power planning decides your permit timeline and your rental readiness. Undersized service forces expensive rework after drywall closes, and inspectors catch those shortcuts every single time.
Here I cover load calculations, service feeds, trenching, circuit layout, code, HVAC power, EV and solar readiness, safety systems, budgets, mistakes, hiring, and maintenance.
What Electrical System Design for ADUs Actually Means
Electrical system design for an ADU is the engineered plan that defines how electricity travels from the utility source to every outlet, fixture, and appliance inside a second dwelling on the same lot. It answers three questions before anyone picks up a tool: how much power, how it gets there, and how it stays safe.
I think of it as two halves. One half lives outside the ADU: the utility connection, the meter arrangement, the main panel, the feeder, and the trench. The other half lives inside: the subpanel, branch circuits, receptacles, lighting, and protective devices.
The design is documented, not improvised. It appears as a load calculation worksheet, a one-line diagram, a panel schedule, and a floor plan with symbols for every device.
The Core Components of an ADU Electrical System
Every ADU electrical system contains the same building blocks. There is a source of power, a means of disconnect, an overcurrent device, a distribution panel, feeders and branch circuits, grounding and bonding, and the devices at the end of each run.
Grounding and bonding deserve special attention in an ADU. A detached unit fed by a subpanel keeps its neutral and ground separated at that subpanel, and it needs its own grounding electrode system.
The panel schedule ties it all together. It lists every breaker, its amperage, its protection type, and the loads it serves.
Why ADU Electrical Design Differs From Main-House Wiring
An ADU is a complete dwelling unit sharing a lot with an existing structure, and that shared relationship creates the design challenge. The existing main panel already carries the primary residence, so the ADU competes for whatever capacity remains.
Distance matters more here too. A detached ADU sits 30, 60, sometimes 120 feet from the main panel, which introduces voltage drop and pushes wire sizes larger than a comparable interior remodel needs.
Occupancy rules add another layer. Because the ADU counts as a separate dwelling, it needs its own service disconnect, its own required circuits, and its own alarm system, even when it shares a meter. This is where broader residential electrical service planning intersects with dwelling-specific code.
Who Designs, Who Permits, Who Installs
Three roles show up on almost every project. A designer or engineer produces the load calculation and one-line diagram, a licensed electrical contractor pulls the permit and performs the work, and a municipal inspector verifies compliance at rough-in and final.
On smaller builds, one licensed electrician handles design and installation together. On larger or complex projects, an electrical engineer stamps the drawings first.
I always confirm who owns the load calculation. That single document decides whether your existing service survives the addition or needs an upgrade.
Load Calculation: Sizing Power for a Second Dwelling
A load calculation is the arithmetic that converts your ADU’s appliances, lighting, and square footage into a required amperage. It is the first deliverable in any competent design, and it drives every downstream decision.
The National Fire Protection Association’s NEC Article 220 defines both the standard and optional calculation methods used for dwelling units. Most ADU designs use the optional method because it produces a realistic number for modern all-electric units.
I run the calculation before choosing between a subpanel and a separate service. Skipping this step is the single most common reason ADU projects stall at plan review.
How ADU Electrical Load Is Estimated
The calculation starts with general lighting and receptacle load based on square footage, then adds fixed appliances, then applies demand factors. Small-appliance branch circuits and laundry circuits carry fixed values.
Heating and cooling get compared, and only the larger of the two counts. That rule keeps all-electric ADUs from being wildly oversized.
The result lands as a total amperage at 240 volts. Typical detached ADUs land between 60 and 125 amps.
Appliances That Drive Load Higher
Four items dominate ADU load: the HVAC system, the water heater, the range, and the clothes dryer. Each one draws heavily and each one has an electric or gas path that changes the math.
An electric range, a heat pump water heater, and a heat pump air handler together push a small ADU past 100 amps quickly. Add an EV charger and the number climbs again.
Induction cooking and heat pump equipment are efficient in operation but demanding at peak. I plan for peak, not average.
Reading Your Existing Main Panel Capacity
Your main panel label states its rating, usually 100, 125, 150, or 200 amps. That number is the ceiling for everything on the property.
The existing house load gets calculated the same way the ADU does, then subtracted from the service rating. Whatever remains is available for the ADU.
Older 100-amp services rarely leave enough room for a fully electric ADU. That constraint sends most of those projects toward a main electrical panel upgrade before anything else proceeds.
Feeding the ADU: Subpanel vs. Separate Service
There are two ways to power an ADU: extend a feeder from the existing main panel to a subpanel in the ADU, or install a completely separate utility service with its own meter. This choice shapes cost, timeline, and how utilities get billed.
The subpanel route is faster and cheaper because it avoids utility coordination. The separate service route costs more upfront and gives the ADU independent metering, which matters for rentals.
I make this call after the load calculation, never before. The available capacity in the existing service usually decides it for me.
Subpanel Off the Main House Panel
A subpanel receives a feeder from the main panel and distributes branch circuits inside the ADU. It needs a properly sized feeder breaker, four conductors including a separate equipment ground, and its own grounding electrode at the ADU.
This arrangement shares one meter, so the property owner pays all electricity and recovers it through rent or a submeter. Many landlords prefer that simplicity.
The limit is capacity. A subpanel cannot create power that the main service does not have.
Separate Meter and Independent Service
A separate service means the utility runs its own drop or lateral to the ADU with a dedicated meter and main disconnect. The tenant gets their own utility account and their own bill.
Utility approval, engineering review, and trenching to the utility point all add weeks. Availability depends entirely on your local utility’s rules.
For a long-term rental, the billing separation and clean accounting frequently justify the added cost.
Panel Upgrades and Service Increases
When available capacity falls short, the fix is a service upgrade. That means a new panel, often a new meter socket, new service conductors, and utility coordination.
Upgrading from 100 to 200 amps is the most common move. It creates headroom for the ADU plus future EV charging and electrification.
Load management devices offer an alternative in tight situations. These smart devices shed nonessential loads during peaks so an existing service can legally support more equipment.
Trenching, Conduit, and Feeder Routing
The feeder path between the main panel and a detached ADU is a real construction task, not a detail. It involves trench depth, conduit type, burial cover requirements, and coordination with plumbing and gas lines sharing the same route.
Trenching cost varies wildly with surface conditions. Soft soil is cheap, and concrete, mature tree roots, or rock get expensive fast.
I always dig one trench for everything. Water, sewer, gas, electrical, and low-voltage all travel together with proper separation, which saves both money and yard damage.
Underground vs. Overhead Feeders
Underground feeders run in conduit at code-required burial depths and stay invisible once backfilled. They resist weather and satisfy most design review boards.
Overhead feeders cost less because they skip trenching, but they need clearance heights, weatherhead terminations, and support structures. Many jurisdictions and HOAs restrict them outright.
Underground wins on almost every ADU I see. Aesthetics and durability justify the trench.
Wire Sizing, Voltage Drop, and Distance
Conductor size follows two rules: ampacity for the load and voltage drop for the distance. The longer the run, the larger the conductor needs to be even when the load stays the same.
Standard practice keeps feeder voltage drop at or below three percent. A 100-foot run to a 100-amp subpanel typically calls for larger aluminum or copper conductors than a 20-foot run.
Aluminum feeders cost less at large sizes and appear frequently on ADU projects. They demand correct terminations and antioxidant compound at every lug.
Circuit Layout and Interior Distribution
Interior distribution is where the panel schedule becomes real rooms. Every kitchen counter, bathroom, bedroom, and closet gets assigned to a specific breaker with a specific protection type.
Code sets minimum required circuits for a dwelling unit, and an ADU meets every one of them regardless of size. Two small-appliance circuits, one laundry circuit, one bathroom circuit, and dedicated circuits for fixed appliances are the floor, not the goal.
Good layout separates high-draw loads and groups lighting logically. I map it against furniture placement before finalizing anything, since outlet locations behind a permanent bed are wasted outlets.
Kitchen, Bath, and Laundry Circuits
Kitchens carry the heaviest circuit count in a small footprint. Countertop receptacles need at least two 20-amp small-appliance circuits, and the refrigerator, dishwasher, disposal, and microwave each want their own.
Bathrooms need a dedicated 20-amp circuit for receptacles, all GFCI protected. Ventilation fans and heat lamps get considered separately.
Laundry needs a 20-amp receptacle circuit, plus a 30-amp 240-volt circuit for an electric dryer. Ventless heat pump dryers change that requirement and often simplify tight laundry and dryer vent layouts.
Lighting Design and Switching Plans
Lighting in an ADU works hardest when it is layered. Ambient ceiling light, task light at counters and desks, and accent light create a unit that feels larger than its square footage.
LED fixtures dominate new ADU builds because they cut load and heat. Dimming and multi-location switching add comfort without meaningful cost during rough-in.
I plan switch locations by walking the floor plan as a person would. Every entry point gets a switch at the natural hand position.
Receptacle Spacing and Outlet Placement
Code requires receptacles so that no point along a wall line sits more than six feet from an outlet. Small ADU footprints hit this easily, but odd geometry creates traps.
Kitchen counters have their own spacing rule tied to counter length. Islands and peninsulas carry separate requirements.
Beyond code, I add outlets where tenants actually live: bedside, desk height, near the sofa, and outside the entry door. USB receptacles and floor outlets solve real problems in compact units.
Code Compliance, Permits, and Inspections
Every ADU electrical system is built to the National Electrical Code as adopted and amended by your state and city. The NEC is republished on a three-year cycle, and jurisdictions adopt editions at different times, so the governing edition varies by location.
California, which leads the nation in ADU production, applies its own Title 24 energy standards on top of electrical code. Local amendments add further requirements around solar readiness, EV readiness, and heat pump equipment.
I check the adopted code edition and local amendments before drawing anything. That single call to the building department prevents redesign later.
NEC Requirements That Apply to ADUs
Because an ADU is a separate dwelling unit, dwelling-unit rules apply in full. That includes required branch circuits, a service disconnect, working clearance around the panel, and dedicated grounding.
Panel location rules matter. Panels cannot sit in clothes closets or bathrooms, and they need specified clear working space in front.
Detached structures need a disconnecting means where the feeder arrives. That disconnect and the grounding electrode at the ADU are the two items inspectors check most often.
AFCI, GFCI, and Tamper-Resistant Protection
Modern dwelling code requires arc-fault protection on most branch circuits serving living spaces and ground-fault protection in kitchens, bathrooms, laundry areas, garages, basements, and outdoors. Combination AFCI/GFCI breakers handle both in one device.
Tamper-resistant receptacles are required throughout dwelling units. They cost pennies more and are non-negotiable at inspection.
Newer code editions extended GFCI requirements to more 240-volt appliance circuits, including ranges and dryers. Verify against the edition your city enforces.
The Permit and Inspection Sequence
The sequence runs in a predictable order: plan submittal, permit issuance, trench inspection, rough-in inspection before insulation and drywall, then final inspection with the panel energized and devices installed.
Rough-in is the checkpoint that matters most. Once drywall covers the walls, corrections mean demolition, and this is where good drywall and ceiling coordination with the electrical schedule pays off.
I schedule the electrical rough-in with plumbing and HVAC in the same window. Inspectors prefer it and the trades stay out of each other’s way.
HVAC, Water Heating, and Appliance Electrification
Heating, cooling, and hot water represent the largest electrical loads in a modern ADU, and today they are usually electric. That shift makes mechanical selection an electrical design decision.
Heat pumps dominate ADU mechanical design because they heat and cool with one system at high efficiency. The U.S. Department of Energy notes that air-source heat pumps can reduce electricity use for heating by roughly 65% compared with electric resistance systems, which keeps operating cost reasonable even with electric-only equipment.
I coordinate the mechanical schedule with the panel schedule from the start. Equipment substitutions late in the build change breaker sizes and conductor runs.
Heat Pumps and Mini-Split Circuits
Ductless mini-splits are the standard ADU choice. A single outdoor condenser feeds one or more indoor heads through a dedicated 240-volt circuit, typically 15 to 30 amps depending on capacity.
The circuit needs a disconnect at the outdoor unit and correct maximum overcurrent protection per the equipment nameplate. Nameplate values override generic sizing rules.
Ducted heat pump systems draw more and need air handler power plus condensate management. Compact ADUs rarely have the ceiling volume for ducts, which is why heat pump and HVAC system planning usually lands on mini-splits.
Electric vs. Gas Water Heating Decisions
Water heating splits three ways in ADUs: heat pump water heater, electric tankless, and gas. Each choice has a distinct electrical footprint.
Heat pump water heaters run on a 30-amp 240-volt circuit and deliver excellent efficiency, but they need air volume and produce cool exhaust air. Electric tankless units demand enormous amperage, sometimes 100 amps or more, which disqualifies them on constrained services.
Gas water heating keeps electrical load low while requiring a gas line, venting, and combustion air. Many jurisdictions now discourage or restrict new gas connections, so I confirm local policy before specifying it, alongside the rest of the water heater and plumbing scope.
EV Charging, Solar, and Battery Readiness
An ADU built today gets used for decades, and the loads it needs to serve keep growing. EV charging, rooftop solar, and battery storage all belong in the design conversation now, even when installation comes later.
Readiness costs a fraction of retrofit. Running conduit and a spare raceway during construction converts a future five-figure project into a straightforward equipment install.
I always specify spare breaker spaces and at least one empty conduit run. That single decision ages the system well.
Planning an EV Circuit Before Drywall
A Level 2 EV charger typically needs a 40 to 60 amp 240-volt circuit. Running that circuit during construction, or at minimum installing conduit to the parking location, is the cheapest hour of electrical work on the project.
Where service capacity is tight, load-sharing chargers and energy management systems let an EV circuit coexist with a fully loaded panel. These devices are code-recognized and widely available.
Parking location drives conduit routing. I mark it on the site plan alongside the trench.
Solar, Storage, and Backup Considerations
Solar readiness means a conduit path from roof to panel, adequate roof structure, and space for an inverter and a solar breaker. Several states already mandate solar or solar-ready provisions on new dwellings.
Battery storage adds a location requirement, ventilation clearances, and a transfer arrangement for backup circuits. Batteries need floor space and a rated wall, so they get located during design, not after.
Backup planning starts with a critical loads list: refrigerator, lighting, internet, and one HVAC head cover most needs.
Safety Systems, Smart Controls, and Accessibility
Safety systems in an ADU are code-mandated, not optional upgrades. Smoke alarms, carbon monoxide alarms, and proper protective devices form the life-safety layer of the electrical design.
Smart controls and accessibility features sit alongside them. Both raise the unit’s value for aging occupants and long-term tenants.
I design these in at rough-in. Adding interconnected alarms or accessible controls after finish work means opening walls.
Smoke, CO, and Interconnected Alarms
Dwelling units need smoke alarms in each sleeping room, outside sleeping areas, and on every level. New construction requires hardwired, interconnected alarms with battery backup so all devices sound together.
Carbon monoxide alarms are required where fuel-burning appliances or attached garages exist. All-electric ADUs with no attached garage sometimes fall outside that requirement, though local rules vary.
Placement rules keep alarms away from cooking appliances and bathroom doors to limit nuisance trips. Combination smoke/CO units simplify layout in tight floor plans.
Smart Panels, Metering, and Mobility-Friendly Controls
Smart panels and circuit-level monitoring let a landlord see consumption per circuit and shed load automatically. For a shared-meter ADU, submetering settles the utility question cleanly.
Accessibility comes down to reach ranges and control types. Rocker switches, lighted switches, receptacles raised to 18 inches, and lower thermostat mounting heights serve occupants with limited mobility.
Motion-activated lighting at entries, hallways, and bathrooms reduces fall risk at night. These pair naturally with broader home safety and mobility upgrades.
Budgeting ADU Electrical Work
Electrical work usually represents one of the larger line items in an ADU budget, sitting behind foundation, framing, and mechanical systems. The range is wide because the variables are wide.
A simple subpanel feed to a compact studio with existing service headroom sits at the low end. A separate utility service, panel upgrade, long trench, and full electrification sits at the high end.
I break the estimate into four buckets: service and feed, trench and conduit, interior rough-in and devices, and permits and inspections. Quoting them separately makes trade-offs visible.
What Drives Cost Up or Down
Five factors move the number most: existing service capacity, distance from the main panel, trench surface conditions, gas versus all-electric appliance selection, and whether a separate meter is required.
Trenching through a driveway or mature landscaping adds cost quickly. Restoring hardscape and irrigation afterward belongs in the budget, and coordinating with landscape restoration work up front prevents surprise line items.
Permit fees and utility connection charges vary dramatically between jurisdictions. I get both in writing before finalizing a budget.
Where Rental ADUs Justify Extra Spend
For a rental, three upgrades pay back reliably: separate metering, a service with headroom for future loads, and EV-ready conduit. Each removes a future disruption while a tenant occupies the unit.
Durable devices, extra receptacles, and quality lighting reduce service calls and turnover friction. Cheap devices fail during tenancy, and every failure is a trip charge.
Skipping readiness to save a few hundred dollars costs thousands later. That trade rarely works in an owner’s favor.
How Do I Know if My ADU Electrical Plan Is Actually Ready to Build?
A plan is ready when four documents exist and agree with each other: a completed load calculation, a one-line diagram showing the service arrangement, a panel schedule listing every circuit, and a floor plan marking every device. Missing any one of those means the design is incomplete.
Everything that follows here covers what goes wrong, how to choose the right professional, and how to keep the system healthy after the final inspection.
Common ADU Electrical Design Mistakes
The same mistakes repeat across ADU projects. Most trace back to skipping the load calculation or deciding the service arrangement too late.
Undersizing the feeder is the most expensive error. Correcting it means re-trenching and repulling conductors through finished landscaping.
Other frequent misses include forgetting the grounding electrode at a detached structure, placing the panel in a prohibited location, omitting the required laundry or bathroom circuit, and installing outlets before furniture placement is settled. Each one surfaces at inspection or at move-in, and each one costs more than the planning that prevents it.
Choosing and Working With an ADU Electrician
The right professional for an ADU holds a current electrical license, carries insurance, and has permitted ADU work in your jurisdiction before. That last item matters most, because local amendment knowledge saves weeks.
I ask for three things: license number, proof of insurance, and two recent ADU addresses with permit numbers. Verifiable projects separate specialists from generalists.
Scope clarity prevents disputes. The proposal names the service arrangement, the feeder size, the circuit count, who trenches, who backfills, and which inspections are included. Coordinating that scope with the rest of the trades keeps a full-service remodeling and build schedule on track.
Maintenance and Long-Term System Care
An ADU electrical system needs light but consistent attention. Annual checks catch the small failures that become large ones.
I test every GFCI and AFCI device once a year, press the test button on each smoke and CO alarm monthly, and replace alarm units at their ten-year expiration. Panel covers get checked for warmth, discoloration, and buzzing.
Between tenancies is the natural window for a deeper look: torque checks on panel terminations, receptacle tension testing, and verification that no circuit runs consistently near capacity. Scheduling that inspection alongside routine handyman and property upkeep visits keeps the whole property on one maintenance rhythm.
Conclusion
I have walked through load calculations, service arrangements, trenching, circuit layout, code compliance, electrification, readiness planning, safety systems, budgets, and long-term care.
Each of these areas connects to deeper resources on panels, HVAC, plumbing, and safety upgrades that expand what this hub introduces.
We help you plan and build ADU electrical systems correctly the first time. Connect with Mr. Local Services and get a licensed professional on your project.
Frequently Asked Questions
How many amps does an ADU need?
Most detached ADUs need between 60 and 125 amps. The exact figure comes from a load calculation covering HVAC, water heating, cooking, laundry, and any EV charging.
Can an ADU share the main house electrical panel?
Yes, through a subpanel fed from the main panel. This works when the existing service has enough spare capacity after the primary residence load is counted.
Does an ADU need its own electrical meter?
Not always. A separate meter is optional in many jurisdictions but valuable for rentals because it separates tenant utility billing from the owner’s account.
Do I need a permit for ADU electrical work?
Yes. All ADU electrical work requires a permit, plan review, and inspections at trench, rough-in, and final stages by a licensed electrical contractor.
How deep does the electrical trench to an ADU need to be?
Burial depth depends on conduit type and voltage, generally 18 to 24 inches for residential feeders. Your local inspector confirms the exact requirement before backfill.
Should an ADU be all-electric or use gas?
All-electric simplifies permitting in many cities and supports heat pump efficiency. Gas lowers electrical load but adds venting, gas lines, and possible local restrictions.
When should EV charging be added to an ADU?
During construction. Installing the circuit or conduit before drywall costs a fraction of retrofitting it once walls, finishes, and landscaping are complete