Plumbing system design for ADUs is the planning process that determines how an accessory dwelling unit gets clean water, removes waste, and vents safely. I treat it as the single most consequential system in any ADU build, because itnew
Water and sewer decisions get locked in early. Change them later and you pay twice, dig twice, and delay occupancy by weeks or months.
This guide covers supply planning, DWV design, sewer and septic choices, water heating, fixture layout, codes, trenching, materials, costs, mistakes, maintenance, and hiring.
What Plumbing System Design for ADUs Actually Means
Plumbing system design for ADUs is the engineering and layout plan that connects a secondary dwelling to potable water, drainage, venting, and hot water production. It answers three questions before a shovel touches dirt: where the water comes from, where the waste goes, and how the whole system stays code-compliant.
I think of it as three interlocking systems rather than one. Supply brings pressurized water in. Drain, waste, and vent carries used water out. Water heating sits between them and eats most of the energy budget.
ADUs make this harder than a standard bathroom addition. The unit sits far from the existing plumbing core, often across a yard, sometimes behind a garage. Distance means pressure loss, trenching, and hard choices about shared versus dedicated service.
Core Components of an ADU Plumbing System
Every ADU plumbing plan includes the same building blocks. A water service line from the meter or the main house. Hot and cold distribution piping. Fixtures with shutoffs. A drain line to the sewer lateral or septic tank. Vent piping through the roof. A water heater sized to the unit.
Add-ons show up depending on the site. Backflow preventers, pressure-reducing valves, ejector pumps, and separate submeters all appear regularly.
How ADU Plumbing Differs From Main-House Plumbing
The main house already has an established service size, a proven lateral, and a fixed meter. An ADU inherits or splits those resources, and that inheritance is the whole design problem.
I run into three recurring constraints. Existing meter capacity, existing lateral capacity, and the physical distance between the two structures. All three cap what the ADU can support.
Attached, Detached, and Garage Conversion ADUs
Attached ADUs share a wall with the main house, so I can usually extend existing supply and drain lines a short distance. That is the cheapest path.
Detached ADUs need a full underground run for water and sewer. Garage conversions land in the middle, since the slab already exists but rarely has plumbing rough-ins in the right places.
Water Supply Planning: Sizing, Pressure, and Connection Options
Water supply planning determines whether your ADU gets adequate flow at every fixture. I start with the existing service size, measure static pressure at a hose bib, then calculate the pressure loss over the run to the new unit.
The U.S. Environmental Protection Agency reports the average American family uses more than 300 gallons of water per day at home, and an ADU adds meaningfully to that household total. That added demand is what pushes many older services past their comfortable limit.
Undersized supply shows up as a shower that dies when the kitchen tap opens. It is the most common complaint I hear from ADU tenants.
Tapping the Existing Main vs. Installing a Separate Service
Tapping the existing main is faster and cheaper. I splice into the house service after the meter, run a branch to the ADU, and add a shutoff. This works well on 1-inch services with modest main-house demand.
A separate service means a new tap at the street, a new meter, and a new bill. It costs far more upfront and delivers full independence, accurate billing, and no shared-pressure conflicts.
Pipe Sizing and Water Pressure Basics
Long runs steal pressure. I size the underground supply line one step larger than the interior distribution piping to offset friction loss over distance.
Most residential systems perform well between 40 and 80 psi. Above that range I install a pressure-reducing valve to protect fixtures and appliances from premature failure.
Separate Water Meters and Submetering
Landlords ask about metering constantly. A full separate meter from the utility gives the tenant their own account and removes you from the billing conversation entirely.
A private submeter costs far less and lets you allocate usage yourself. I recommend it for owner-occupied properties renting a single unit.
Drain, Waste, and Vent (DWV) Design for ADUs
DWV design governs how wastewater leaves the ADU and how air enters the system to let it flow. Get the slope wrong and the line clogs. Get the venting wrong and traps siphon dry, letting sewer gas into the living space.
I design DWV before I finalize the floor plan. Drain lines need gravity and space, and both are scarce in a 500-square-foot footprint.
Gravity Drainage and Slope Requirements
Standard horizontal drain lines run at a quarter-inch of fall per foot. Too flat and solids settle. Too steep and water outruns the solids, leaving them behind.
Distance eats elevation fast. A 60-foot run to the lateral consumes roughly 15 inches of vertical drop, which often forces the ADU slab higher than owners expect.
Venting Strategies in Tight Footprints
Every fixture needs venting. A single stack through the roof serves a stacked kitchen and bath cleanly, and that is my default in compact units.
Where a roof penetration is impractical, air admittance valves solve individual fixture venting, though many jurisdictions restrict them. I confirm local acceptance before designing around them.
Sewer Ejector Pumps and Below-Grade Fixtures
Some ADUs sit lower than the sewer lateral. Basement conversions do this constantly. A sewer ejector pump collects waste in a sealed basin and pumps it up to the gravity line.
Pumps add a maintenance item and a power dependency. I avoid them when grading allows gravity, and I install them without hesitation when it does not.
Sewer and Septic Connection Decisions
Your sewer connection choice ranks with water supply as a top budget driver. I evaluate the existing lateral’s size, material, age, and condition with a camera inspection before committing to any plan.
An old clay or cast iron lateral carrying a second dwelling is a liability. I have watched owners save money on the ADU and then replace the entire lateral eighteen months later.
Shared Lateral vs. Dedicated Lateral
A shared lateral means the ADU ties into the existing house line. It is cheaper and it works when the lateral is sound and adequately sized, typically 4 inches for residential use.
A dedicated lateral runs its own line to the main. It costs more, eliminates shared-blockage risk, and satisfies jurisdictions that require independent connections for separate dwelling units.
Septic Capacity and Drain Field Limits
Septic systems change the calculation completely. Capacity is sized by bedroom count, and adding an ADU adds bedrooms. The U.S. EPA notes that more than one in five U.S. households depend on septic systems, so this affects a large share of ADU projects.
I always order a septic evaluation first. Tank volume, drain field size, and soil percolation determine whether an ADU is even permittable, and no plumbing design overcomes a failing field.
Water Heating Options for Small Dwellings
Water heating serves every hot fixture in the ADU and drives ongoing operating cost. The U.S. Department of Energy reports water heating accounts for about 20% of a typical home’s energy use, making it the second largest energy expense in most dwellings.
I size for peak simultaneous demand, not average use. One shower plus a kitchen sink is the realistic worst case in most units.
Tankless, Tank, and Heat Pump Water Heaters
Tankless units save floor space and deliver endless hot water, which suits ADUs with tight utility closets. They need higher gas input or a substantial electrical circuit.
Traditional tanks cost less to install and tolerate simultaneous demand well. Heat pump water heaters cut electricity use dramatically and need adequate air volume around them, which small closets rarely provide.
Sizing for One-Bath and Two-Bath ADUs
A single-bathroom ADU runs comfortably on a 30 to 40 gallon tank or a modest tankless unit. That covers a shower, a kitchen sink, and a washer.
Two bathrooms change everything. I move to a 50 gallon tank or a higher-capacity tankless model to prevent the second shower from running cold.
Fixture Layout and Wet Wall Planning
Fixture layout determines how much pipe you buy and how much labor you pay for. Grouping fixtures around a shared wet wall is the single most effective cost-control move in ADU plumbing.
I lay out the wet wall first, then arrange rooms around it. Owners who design the floor plan first almost always pay a premium to plumb it.
Stacking Kitchens, Baths, and Laundry
Placing the kitchen sink, bathroom fixtures, and laundry hookups on one shared wall lets a single vent stack and a single drain run serve everything. Fewer penetrations, fewer fittings, fewer failure points.
Two-story ADUs benefit further from vertical stacking. Aligning the upstairs bath directly above the downstairs bath keeps the entire system in one chase.
Fixture Unit Counts and Flow Rates
Plumbing codes assign each fixture a drainage fixture unit value, and the total determines your required pipe sizes. A toilet, shower, lavatory, kitchen sink, and washer produce a modest total that a properly sized system handles easily.
Flow rates matter on the supply side. WaterSense-labeled fixtures use at least 20% less water than standard models according to EPA specifications, which reduces both demand and utility cost.
Codes, Permits, and Inspections
Plumbing permits are not optional for an ADU. Unpermitted work blocks occupancy certificates, complicates insurance claims, and surfaces during resale inspections.
I pull the plumbing permit alongside the building permit and schedule inspections into the construction timeline from day one.
Uniform and International Plumbing Codes
Most jurisdictions adopt either the Uniform Plumbing Code or the International Plumbing Code, then amend it locally. The differences show up in venting rules, approved materials, and trap arm limits.
I verify which code governs my jurisdiction before drawing anything. Designing to the wrong code wastes a plan review cycle.
Local ADU Ordinances and Utility Requirements
State ADU laws set the floor, and local ordinances fill in the details. Some cities require separate utility connections. Others explicitly permit shared service to keep costs down.
Utility districts add their own rules on meter sizing, backflow prevention, and capacity fees. I call the water purveyor before the architect finalizes anything.
Inspection Milestones: Rough-In, Pressure Test, Final
Three inspections matter most. Rough-in happens with pipes exposed before insulation and drywall. Pressure testing proves the supply and DWV systems hold under load.
Final inspection confirms fixtures, traps, shutoffs, and water heater installation. I never let drywall close over uninspected plumbing, because opening it back up costs far more than waiting.
Trenching, Insulation, and Freeze Protection
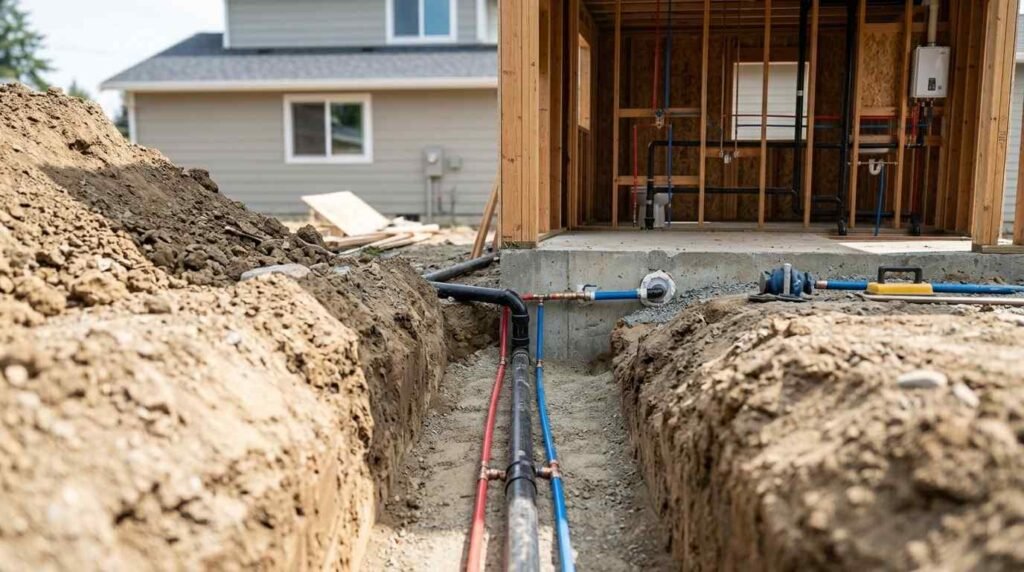
Trenching connects the ADU to everything, and it is where surprises live. Tree roots, existing utilities, rock, and high water tables all change the cost after excavation starts.
I call for utility locates every time. Hitting a gas line or a fiber conduit turns a routine trench into an emergency.
Trench Depth, Bedding, and Backfill
Water lines go below the local frost line, and sewer lines follow the slope they need to maintain fall. Both need sand or gravel bedding to prevent settling and point loading.
Backfill matters as much as depth. Rocky fill dumped directly on PEX or PVC creates stress points that fail years later.
Cold Climate and Crawlspace Protection
Cold climates demand deeper burial, insulated sleeves, and careful attention to any pipe running through unconditioned space. Crawlspaces and exterior walls are where ADU pipes freeze.
I keep supply lines inside the thermal envelope wherever possible. Heat tape is a backup, not a design strategy.
Materials Selection: PEX, Copper, CPVC, and ABS
Material choice affects cost, longevity, and installation speed. PEX dominates modern residential supply work because it flexes around obstacles, resists freeze damage better than rigid pipe, and needs fewer fittings.
Copper still earns its place. It handles high temperatures, resists UV, and inspectors trust it. It costs more in both material and labor.
Matching Material to Climate and Budget
For drainage, ABS and PVC both perform well, and local code usually dictates which one. Cast iron appears where sound dampening between units matters.
I match material to conditions rather than habit. Underground supply runs get PEX or copper depending on soil chemistry, and exposed interior runs get whatever the inspector prefers.
Cost Drivers and Budget Planning
ADU plumbing costs vary enormously by site, and the variables are predictable once you know where to look. Distance from the main house, sewer connection type, and grade differences drive the biggest swings.
Overall ADU construction is not cheap. The California Department of Housing and Community Development documents ADUs as a significant share of new housing production in the state, and plumbing typically represents a meaningful slice of total project cost.
I budget plumbing as a range rather than a number until the site investigation is complete. Camera inspection, septic evaluation, and utility locates all reduce uncertainty before the contract is signed.
What Moves the Price Most
Trenching length tops the list. Every additional foot between structures adds excavation, pipe, backfill, and restoration cost.
A new sewer lateral, a new water meter, an ejector pump, or a septic system upgrade each add substantial line items. Any one of them reshapes the budget.
Where Owners Overspend
Owners overspend by scattering fixtures across the floor plan. Three separate wet walls in a 600-square-foot unit triples the drain and vent work for zero functional gain.
The second overspend is skipping the site investigation. Discovering a failed lateral mid-construction costs multiples of what a camera inspection costs upfront.
Common ADU Plumbing Design Mistakes
Most ADU plumbing failures trace back to design decisions, not workmanship. Undersized supply lines, insufficient drain slope, and missing vents cause the majority of callbacks I see.
Skipping the existing-system evaluation ranks close behind. Tying a new dwelling to a marginal lateral or an exhausted septic field transfers the problem, it does not solve it.
The third pattern is designing the floor plan without the plumber in the room. Fixture placement drives cost, and involving a licensed plumber during schematic design saves real money.
Long-Term Maintenance and Tenant Considerations
An ADU plumbing system needs the same upkeep as a full house, compressed into a smaller space. Accessible shutoffs, labeled valves, and a documented layout make every future repair faster and cheaper.
I install a dedicated main shutoff for the ADU near its entry point. Tenants and technicians both need to isolate the unit without touching the main house.
Water heater flushing, drain cleaning, and periodic lateral inspection belong on a written schedule. Landlords who document plumbing maintenance handle tenant complaints and insurance questions with far less friction.
How to Hire the Right ADU Plumbing Professional
I look for a licensed plumber with documented ADU experience in my specific jurisdiction. ADU plumbing lives at the intersection of code, utility policy, and site conditions, and local familiarity shortens the permit path substantially.
Ask for the license number, proof of insurance, and references from completed ADU projects. Request a written scope that names the connection method, materials, fixture count, and inspection responsibilities.
Coordination matters as much as skill. The plumber, the general contractor, and the designer need to be aligned before framing starts, and Mr. Local Services connects property owners with vetted professionals who work that way.
Conclusion
I have covered supply sizing, DWV design, sewer and septic decisions, water heating, fixture layout, codes, trenching, materials, costs, mistakes, and maintenance for ADU plumbing.
Each of these areas goes deeper than one guide allows, and dedicated resources on permits, water heaters, and sewer connections expand what you read here.
We help homeowners and property managers plan ADU plumbing correctly the first time. Contact Mr. Local Services to connect with licensed plumbing professionals near you.
Frequently Asked Questions
Does an ADU need its own water meter?
Not always. Many jurisdictions allow a shared meter with a private submeter, while others require a separate utility connection for each dwelling unit.
Can an ADU share the main house sewer line?
Often yes, provided the existing lateral is sound and properly sized. A camera inspection confirms condition before you commit to a shared connection.
How far can an ADU be from the main house plumbing?
Distance is limited by pressure loss on the supply side and available fall on the drain side. Longer runs need larger pipe and careful grade planning.
What water heater size works for a small ADU?
A one-bathroom ADU runs well on a 30 to 40 gallon tank or a compact tankless unit. Two bathrooms need roughly 50 gallons or more capacity.
Do I need a permit for ADU plumbing work?
Yes. Plumbing permits are required for new dwelling units, and unpermitted work blocks your certificate of occupancy and complicates insurance and resale.
Will an ADU overload my septic system?
It can. Septic capacity is sized by bedroom count, so an evaluation of tank volume, drain field size, and soil percolation is required first.
Is PEX or copper better for ADU plumbing?
PEX costs less, installs faster, and resists freeze damage better. Copper lasts longer under heat and UV exposure. Local code often narrows the choice.