

A garbage disposal is a small electric appliance mounted under the kitchen sink that grinds food waste into particles fine enough to pass safely through household drain plumbing. For homeowners, landlords, and property managers, it is one of the most heavily used kitchen fixtures in the building — and one of the most frequently misunderstood when something goes wrong.
Disposals fail in predictable ways, and the cost of guessing wrong is wet cabinets, clogged drains, voided warranties, or unnecessary replacement before the unit’s true end of life.
This guide explains how disposals work, types and sizing, installation steps, common repairs, leaks, clogs, maintenance, replacement timing, costs, codes, and when to call a licensed professional.
What Is a Garbage Disposal and How Does It Work
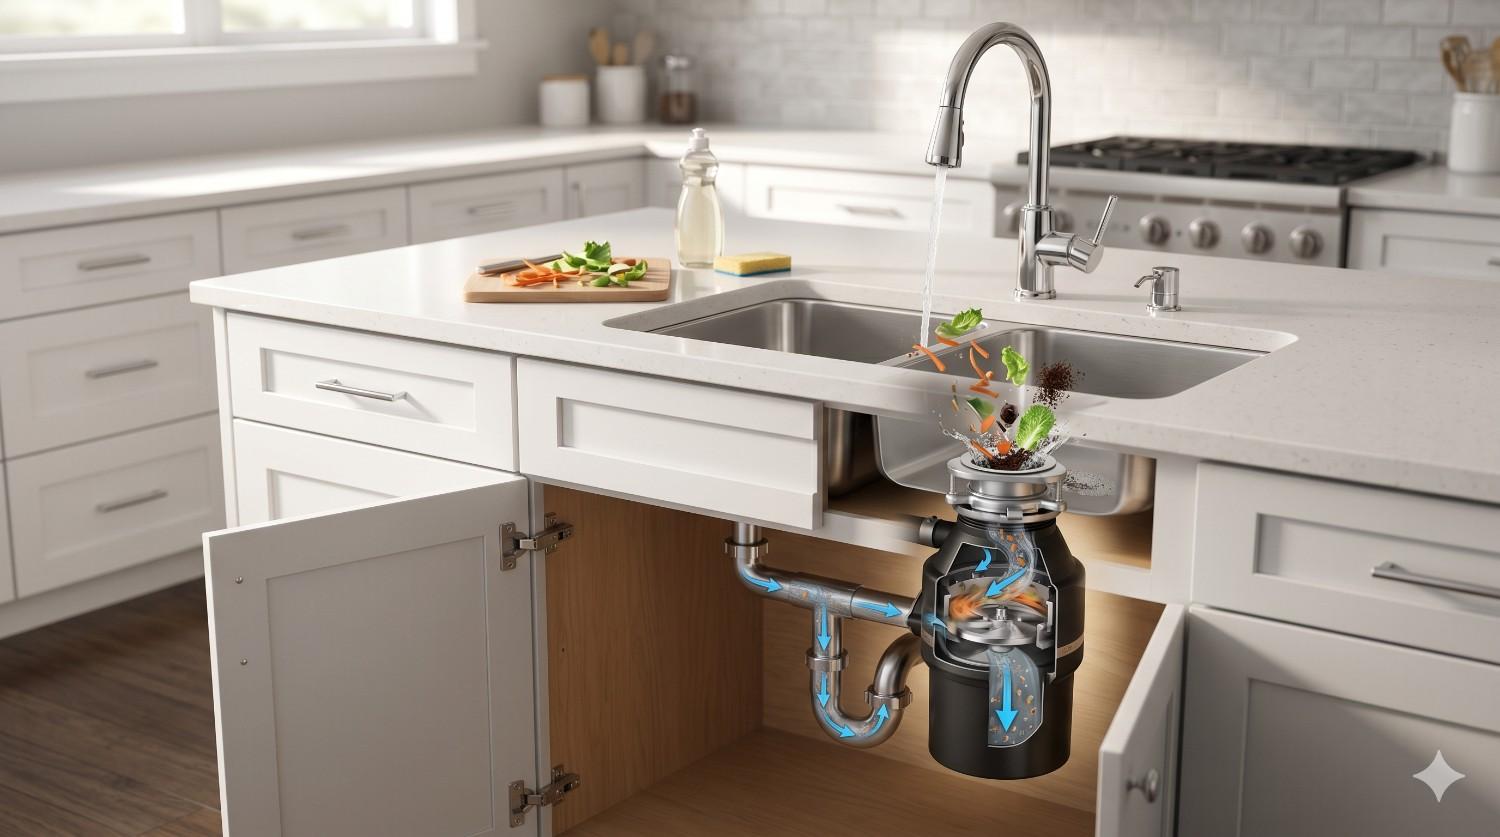
A garbage disposal is an electrically powered grinding chamber installed between the kitchen sink drain and the household waste line. When food scraps enter the chamber and the unit is energized, a high-torque motor spins a flywheel fitted with two blunt impellers. These impellers do not “cut” food — a common misconception. Instead, they sling food outward against a stationary grind ring, where it is pulverized into slurry that washes down the drain with running water.
The system has four core components that homeowners and property managers should recognize: the sink flange and mounting assembly at the top, the grinding chamber and motor housing in the middle, the discharge tube that connects to the P-trap, and the electrical connection at the base. A reset button — usually red — sits on the bottom of the unit and trips when the motor overheats or stalls.
Disposals are designed for soft food waste, modest volumes at a time, and continuous cold water flow during operation. They are not designed for grease, fibrous vegetables, bones, fruit pits, eggshells in quantity, or coffee grounds in volume — even though many homeowners use them that way.
Types of Garbage Disposals: Continuous Feed vs. Batch Feed
Two basic feed designs dominate the residential market, and choosing between them shapes installation, safety, and long-term use.
Continuous Feed Disposals
A continuous feed unit operates whenever the wall switch is on. Homeowners can scrape food into the disposal while it runs. These are the most common type sold in the United States because they are faster, cheaper, and familiar to most users. The trade-off is exposure: anything that falls into the running disposal — a spoon, a ring, a finger — is in the grind chamber.
Batch Feed Disposals
A batch feed unit only operates when a magnetic stopper is seated in the sink flange. The user loads food, inserts the stopper, twists it to engage, and the disposal runs. Batch feed units are safer in homes with small children, more expensive, and slower for high-volume kitchens. They also do not require a dedicated wall switch, which can simplify installations in some older homes.
Horsepower Ratings and Sizing
Residential disposals range from 1/3 horsepower to 1 horsepower and beyond. Smaller motors (1/3–1/2 HP) suit apartments and light use. Mid-range units (3/4 HP) fit most family homes. Full 1 HP units are best for heavy cooking households, multi-family rentals, or homes on long drain runs where extra torque reduces jam risk.
Signs You Need a New or Repaired Garbage Disposal
A disposal communicates trouble before it dies completely. The most common warning signs include persistent humming with no grinding, frequent reset trips, slow drainage that returns after every flush, water under the sink that appears only after the disposal runs, metallic grinding noises, odors that resist cleaning, and visible rust at the sink flange or housing seams.
Age matters too. Most residential disposals last 8 to 15 years under normal conditions. Units in heavy-use kitchens, rentals, or homes with hard water often fall toward the shorter end of that range. Knowing which symptoms point to repair and which point to replacement is the practical core of this guide.
Garbage Disposal Installation: Process Overview
Installation looks straightforward in a YouTube tutorial and considerably less so when the existing flange is corroded, the new unit is heavier, and the drain pipe sits at the wrong height. A typical install includes mounting a new sink flange with plumber’s putty or a butyl gasket, attaching the mounting ring under the sink, hanging the disposal body, connecting the discharge tube to the P-trap, tying in the dishwasher drain hose, and completing the electrical connection.
Pre-Installation Considerations
Before installing, confirm three things: the cabinet has clearance for the unit’s body, the existing electrical circuit can support the new motor (most disposals require a dedicated 15- or 20-amp circuit with a GFCI outlet), and the drain height matches the unit’s discharge tube without requiring a high-loop loss of slope.
Standard Installation Sequence
The general order is: shut off power, remove the old unit, clean the sink flange area, install the new mounting assembly, attach the new disposal, complete drain and dishwasher connections, restore electrical power, and run a full water test for leaks at every joint.
Electrical and Plumbing Connections
The two most common installation failures are electrical (wrong wire gauge, missing GFCI, no dedicated circuit) and plumbing (over-tightened slip nuts cracking the discharge tube, wrong P-trap orientation, missing dishwasher knockout plug). Both are inspector-flagged issues.
A garbage disposal sits at the intersection of three systems — electrical, drain, and sink hardware — which is why it falls under the broader category of plumbing fixture installation rather than appliance work alone. Treating it as a fixture, not a gadget, sets the right expectations around mounting, sealing, and code compliance.
How a Garbage Disposal Connects to Your Kitchen Plumbing
The disposal is rarely the most complicated thing under the sink — it just happens to be the loudest. It shares the cabinet with the cold and hot supply lines, the sink tailpiece, the P-trap, the dishwasher discharge, the angle stops, and sometimes a water filter. Every one of these can influence how the disposal performs and how it fails.
Discharge water from the disposal joins the dishwasher drain hose at the unit’s side inlet, then flows out through the discharge tube into the P-trap. From there, waste enters the branch drain in the wall and travels to the main stack. A clog in any segment of this path can present at the disposal — even when the disposal itself is mechanically fine.
The disposal does not operate in isolation; its drain ties directly into the sink tailpiece, the P-trap, the dishwasher branch, and the main drain line beneath the cabinet. Understanding how these components share a single drain path is the foundation of kitchen plumbing in any modern home.
Common Garbage Disposal Problems and Their Causes
The same four problems account for the overwhelming majority of disposal service calls.
Disposal Won’t Turn On
The unit makes no sound at all when switched. Causes include a tripped reset button, a tripped circuit breaker, a faulty wall switch, a failed motor, or — in newer GFCI installations — a tripped outlet upstream.
Humming Without Grinding
The motor energizes but the flywheel does not spin. This is almost always a jam: a fruit pit, bone fragment, utensil, or accumulated grease has locked the impellers. Hex key relief slots on the bottom of most units allow the flywheel to be rocked free manually.
Slow Drainage and Backups
The disposal grinds correctly but water rises in the sink. The blockage sits downstream — in the P-trap, the branch drain, or the wall — not in the disposal itself.
Unusual Noises
A rattling or clanking sound usually means something foreign is in the chamber: a bottle cap, a coin, a piece of broken glass. A high-pitched whine without grinding can indicate a worn bearing or a failing motor approaching the end of its service life.
Most disposal failures fall into a small set of recurring patterns — motor faults, jammed flywheels, drain blockages, and leaks at the connection points — and the diagnostic logic mirrors the broader principles of plumbing repair used across every fixture in the home.
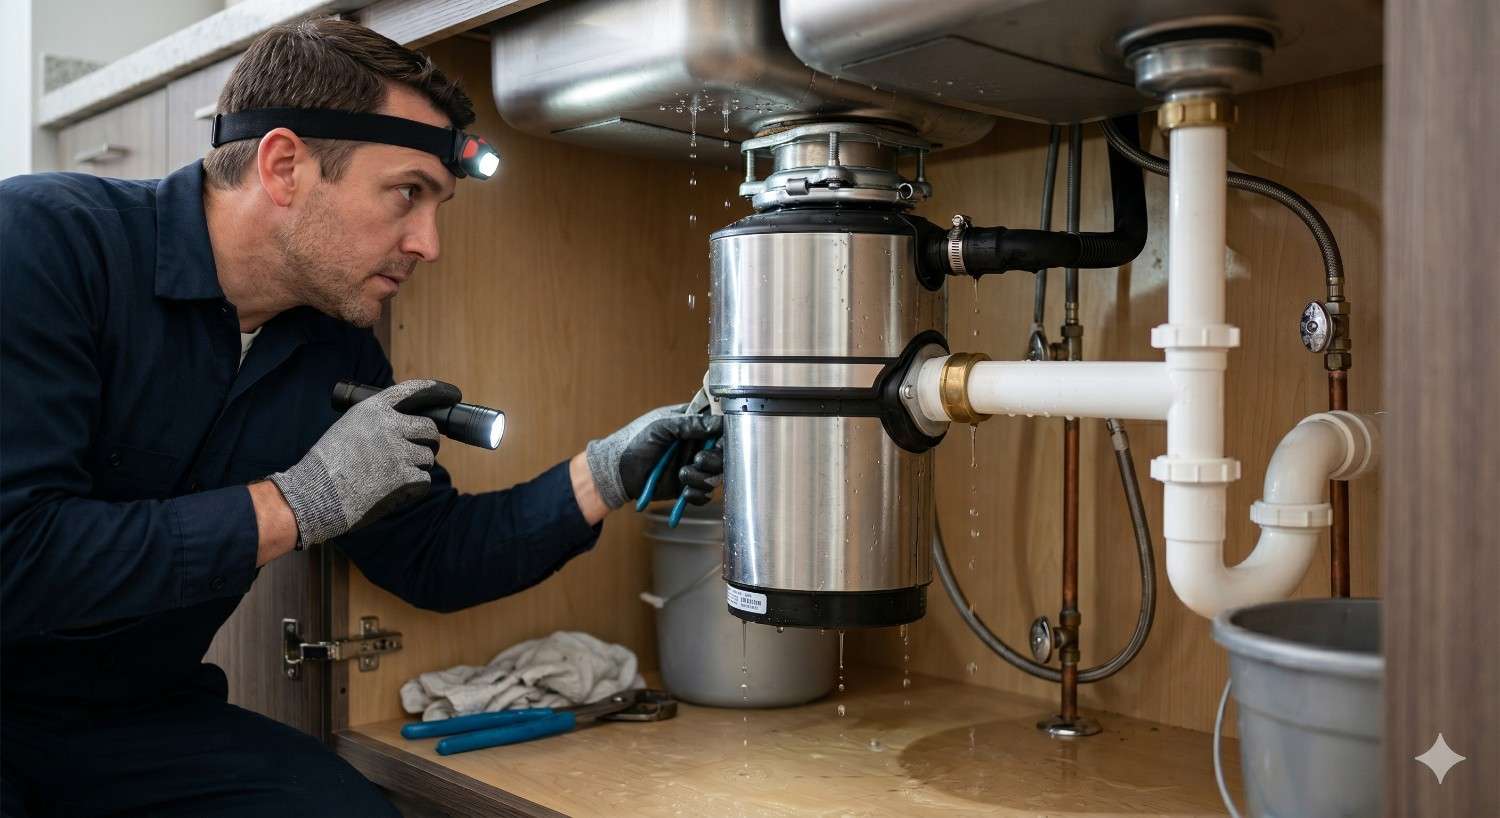
Garbage Disposal Leaks: Where They Start and What They Mean
Leaks under a disposal almost never originate where the water lands. Three locations account for nearly all of them: the sink flange seal at the top of the unit, the dishwasher inlet hose on the side, and the discharge tube connection to the P-trap. Less commonly, a cracked housing indicates internal corrosion and signals end of life.
Identifying the true source requires drying everything completely, running the disposal with the sink full, and watching for the first bead of water to form. A flashlight and a paper towel are the standard diagnostic tools. Confusing the symptom with the source leads to the wrong repair, repeated leaks, and damaged cabinetry.
A slow drip under the sink is rarely “just the disposal.” Water can travel along the underside of the unit before pooling on the cabinet floor, which is why proper water leak detection looks at the sink flange, dishwasher inlet, discharge tube, and drain trap as a single system.
Drain Clogs Caused by Garbage Disposals
A working disposal can still cause clogs — usually because of what gets put into it. Fibrous vegetables (celery, corn husks, artichoke leaves) wrap around the impellers and exit as long strands that snag downstream. Starchy foods (pasta, rice, potato peels) expand in standing water and form pastes inside the P-trap. Grease enters as a liquid and solidifies on cool pipe walls, layer by layer, until flow narrows to a trickle.
The fix depends on location. A clogged disposal chamber gets cleared by hand with the power off. A clogged P-trap is removed and rinsed. A blockage further downstream often requires a hand auger or, in stubborn cases, a professional drain machine.
When grinding slows or the sink begins to back up, the disposal itself is often blameless — the obstruction sits downstream in the trap arm or branch drain. Effective clog removal starts by isolating where the blockage actually lives before opening any pipe.
Repair vs. Replacement: How to Decide
A practical replacement test asks three questions. Is the unit older than 10 years? Has it been repaired more than twice in the past two years? Is water leaking from the housing itself rather than from a fitting? Two yeses tips the math toward replacement.
Repair makes sense for jams, reset trips, loose flanges, dishwasher hose replacements, and discharge tube swaps. Replacement makes sense for failed motors, cracked housings, persistent leaks from the body, or units that no longer meet the household’s grinding demand. Upgrading from 1/3 HP to 3/4 HP in a busy kitchen often costs less in total than repeated repairs.
Garbage Disposal Maintenance Best Practices
A well-maintained disposal is a quiet disposal. The fundamentals are simple: run cold water before, during, and for 15 seconds after every use; feed food gradually rather than in bulk; avoid grease, bones, fibrous waste, and large pits; and grind small ice cubes weekly to scour the chamber walls.
Odor control is mostly about residue. A periodic flush of baking soda followed by white vinegar, then hot water, neutralizes most kitchen smells without damaging seals. Citrus peels in small amounts add a fresh scent but are not a substitute for cleaning.
A disposal that is flushed, inspected, and cleaned on a predictable schedule rarely fails without warning, which is one of the simplest arguments for treating it as part of routine plumbing maintenance rather than waiting for a breakdown.
Cost of Garbage Disposal Installation and Repair
National averages move year to year, but the structure of disposal pricing is stable. A new residential unit ranges from roughly $90 for an entry-level 1/3 HP model to $400+ for a premium 1 HP unit with sound insulation and stainless components. Professional installation typically adds $150 to $400 depending on whether existing plumbing and electrical meet current code.
Common repairs sit in narrower bands. A simple jam clear or reset visit is the lowest tier. Replacing a leaking flange or discharge tube is mid-range. Rewiring a non-compliant circuit or replacing the unit outright sits at the top.
Pricing for disposal work depends on horsepower, brand, mounting style, and whether existing electrical and drain connections meet code, and these same variables drive plumbing costs across every fixture project in the kitchen.

Permits, Codes, and Safety Considerations
In most jurisdictions, like-for-like disposal replacement does not require a permit. New installations, electrical work, and connections involving a dishwasher air gap often do. Local rules govern outlet type (GFCI requirement), circuit dedication, mounting height of the discharge tube, and whether the dishwasher must connect through an air gap or a high loop.
Safety basics for any disposal work include disconnecting power at the breaker (not just the wall switch), never reaching into the chamber by hand, using the unit’s hex relief slot to free jams, and replacing flange seals rather than re-seating worn ones.
Most jurisdictions classify disposal installation under standard fixture work, but air-gap requirements, GFCI outlets, and dishwasher tie-ins are governed by local plumbing codes that vary city to city.
When to Hire a Professional Plumber
DIY is reasonable for jams, reset trips, flange tightening, and routine cleaning. It becomes risky once the work involves removing the unit, modifying drain plumbing, adding or replacing the electrical circuit, or diagnosing a leak whose source is not obvious. Mistakes in any of those categories cause water damage, fire risk, or code violations that surface later during a home inspection.
When the job involves new electrical, code-mandated permits, or a discovery of corroded drain lines behind the wall, calling in professional plumbing services is faster, safer, and frequently cheaper than a second weekend of trial and error.
Conclusion
A garbage disposal is a fixture, an electrical device, and a drain component all at once, which is why understanding installation, repair, and maintenance together is the only way to manage it well.
Use this guide as the hub, and the linked resources for deeper detail on installation, leaks, clogs, costs, codes, and ongoing plumbing care.
When the job moves past basic troubleshooting, we recommend calling Mr. Local Services to connect with a licensed local plumber who can complete the work safely and to code.
Frequently Asked Questions
How long does a garbage disposal typically last?
Most residential garbage disposals last between 8 and 15 years. Heavy use, hard water, and grinding inappropriate foods shorten lifespan, while regular cold-water flushing and gentle use extend it.
Can I install a garbage disposal myself?
Like-for-like replacement is feasible for handy homeowners with proper tools. New installations involving electrical circuits, dishwasher air gaps, or code permits should be handled by a licensed plumber or electrician.
Why does my garbage disposal hum but not spin?
A humming disposal almost always indicates a mechanical jam in the grind chamber. Turn off power, use the hex relief slot on the bottom of the unit to rotate the flywheel free, and clear the obstruction.
What can damage a garbage disposal fastest?
Grease, bones, fruit pits, fibrous vegetables like celery, and large amounts of coffee grounds or eggshells cause the most damage. Cold water and small portions reduce strain on the motor and drain line.
Are batch feed disposals worth the extra cost?
Batch feed disposals cost more but offer significantly better safety, especially in homes with small children. They are a strong choice when household safety matters more than grinding speed.
Do I need a permit to replace a garbage disposal?
In most areas, replacing an existing disposal with a similar unit does not require a permit. New installations, electrical upgrades, or drain modifications typically do. Always confirm with your local building department.
How can I tell if my disposal is leaking from the unit itself?
Dry the entire area completely, plug the sink, fill it with water, then run the disposal briefly. The first place water reappears identifies the source — flange, dishwasher inlet, discharge tube, or housing crack.


