

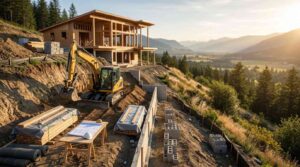
Building on a sloped lot is entirely achievable, but it requires more planning, more specialized contractors, and a deeper understanding of site conditions than building on flat ground. Slopes introduce variables that affect every phase of construction — from the foundation type you choose to how water moves across your property after a rainstorm. Getting these decisions right from the start protects your investment and prevents costly problems down the road.
Sloped lots are more common than many buyers realize, and they often come with real advantages — dramatic views, natural privacy, and lower purchase prices than comparable flat parcels in the same area.
This guide covers every stage of sloped lot construction: site assessment, foundation options, grading, design strategies, permits, costs, contractor selection, landscaping, and long-term maintenance.
What Does Building on a Sloped Lot Actually Mean?
Building on a sloped lot means constructing a home on land that rises or falls across its surface rather than sitting level. The degree of that slope — and the direction it runs — determines nearly every structural and design decision that follows.
Slope is not a single condition. A gentle 5% grade requires modest grading adjustments. A 30% slope demands engineered foundations, significant excavation, and carefully designed drainage systems. Understanding exactly what you are working with before purchasing land or hiring a contractor is the most important step in the entire process.
How Slope Gradient Is Measured and Why It Matters
Slope gradient is expressed as a percentage: the vertical rise divided by the horizontal run, multiplied by 100. A lot that rises 10 feet over 100 horizontal feet has a 10% slope.
Builders and engineers use gradient to classify lots and determine what construction methods are appropriate. Lots under 10% are considered gently sloped and require minimal special treatment. Lots between 10% and 20% are moderately sloped and typically need engineered foundations and grading plans. Lots above 20% are steeply sloped and require full geotechnical assessment, retaining structures, and specialized design.
Types of Sloped Lots: Downslope, Upslope, and Side Slope
The direction a slope runs relative to the street significantly affects design options and construction costs.
A downslope lot falls away from the street. This configuration naturally accommodates daylight basements and walkout lower levels, creating usable below-grade space with direct outdoor access. Views from the rear of the home are typically excellent.
An upslope lot rises away from the street. The home sits higher than the road, which often requires a longer driveway and more excavation at the building pad. Upper-level living areas gain elevated views, but the garage and entry are typically at street level.
A side slope lot runs laterally across the property. These lots often require stepped foundations and split-level floor plans to follow the natural grade without excessive cut-and-fill work.
Is Building on a Sloped Lot Worth It? Pros and Cons
For the right buyer with the right project, sloped lots offer genuine advantages that flat land simply cannot match. But those advantages come with real trade-offs that affect budget, timeline, and long-term ownership.
Advantages of Sloped Lot Construction
Sloped lots frequently sell at a discount compared to flat parcels in the same neighborhood. That price difference can offset a significant portion of the additional construction costs, making the total investment competitive with flat-lot builds in desirable areas.
The design possibilities on a sloped lot are also genuinely distinctive. Multi-level homes, walkout basements, elevated decks, and tiered outdoor spaces are natural fits for sloped terrain. These features are expensive to engineer artificially on flat land but emerge organically from the site’s topography.
Privacy is another consistent benefit. Homes set into hillsides or elevated above neighboring properties naturally create separation that flat suburban lots rarely provide.
Challenges and Hidden Costs to Expect
The primary challenge is cost unpredictability. Sloped lot construction involves more variables than flat-lot building, and those variables are not always visible until excavation begins. Unexpected rock formations, unstable soil layers, or drainage complications discovered mid-project can add tens of thousands of dollars to a budget.
Retaining walls, engineered foundations, extended utility runs, and specialized grading work all add line items that flat-lot builds do not carry. Access for heavy equipment can also be limited on steep sites, slowing construction and increasing labor costs.
Ongoing maintenance is a factor too. Retaining walls require periodic inspection. Drainage systems need clearing. Slopes are inherently more vulnerable to erosion than flat ground, and that vulnerability does not disappear once the home is built.
Site Assessment and Soil Testing Before You Build
No sloped lot construction project should proceed without a thorough site assessment. The information gathered at this stage determines which foundation types are viable, where drainage infrastructure must go, and whether the site carries any risks that would make building inadvisable.
What a Geotechnical Survey Covers
A geotechnical survey — sometimes called a soils report or geotech report — is a professional analysis of the ground conditions beneath a building site. A licensed geotechnical engineer drills test borings or digs test pits to collect soil samples, then analyzes those samples for bearing capacity, composition, moisture content, and stability.
The report produced from this analysis tells your structural engineer and foundation contractor what the soil can support, how deep footings must go to reach stable ground, and whether any conditions — expansive clay, loose fill, high groundwater — require special treatment.
For sloped lots, geotechnical surveys also assess the risk of slope movement. Landslide history, soil saturation patterns, and the presence of bedrock all factor into the engineer’s recommendations. Skipping this step is one of the most expensive mistakes a sloped lot builder can make.
If you are planning a custom build on a challenging site, a geotechnical survey for home construction is a non-negotiable early investment that shapes every structural decision that follows.
Drainage Evaluation and Erosion Risk
Water management is the defining challenge of sloped lot construction. Slopes concentrate and accelerate water flow, directing runoff toward foundations, neighboring properties, and public drainage systems in ways that flat lots do not.
A drainage evaluation maps how water currently moves across the site during rain events and identifies where it pools, channels, or saturates the soil. This information drives decisions about swales, French drains, catch basins, and the grading plan that will redirect water away from the structure.
Erosion risk assessment identifies areas where soil is likely to move during construction — before vegetation is established and before permanent drainage infrastructure is in place. Temporary erosion controls like silt fencing, straw wattles, and erosion blankets are typically required by permit and must be maintained throughout the build.
For a detailed look at managing water on challenging terrain, the sloped lot drainage solutions guide covers every method used to control runoff and protect both the structure and the surrounding landscape.
Foundation Options for Sloped Lots
The foundation is where sloped lot construction diverges most sharply from standard flat-lot building. Three foundation types are commonly used on slopes, and each suits different gradient ranges, soil conditions, and design goals.
Stepped Foundations Explained
A stepped foundation follows the natural grade of the slope by descending in a staircase pattern rather than sitting at a single uniform depth. Each “step” is a separate footing poured at a lower elevation than the one above it, with the foundation wall connecting them.
Stepped foundations are well-suited to moderate slopes where the grade change across the building footprint is significant but manageable. They minimize the amount of excavation required compared to cutting the entire site to a single level, which reduces both cost and soil disturbance.
The key engineering requirement is that each step must be properly tied to adjacent sections and that the height of each step does not exceed the thickness of the footing. A structural engineer must design and specify the step dimensions based on soil conditions and load requirements.
Daylight Basements and Walkout Basements
Downslope lots are natural candidates for daylight and walkout basements — two of the most valuable features a sloped lot can produce.
A daylight basement has at least one wall that is fully or partially above grade, allowing windows to bring natural light into what would otherwise be a dark below-grade space. The exposed wall faces downhill, and the opposite wall is fully buried in the hillside.
A walkout basement takes this further: the downhill wall includes a full-height door that opens directly to grade level at the rear of the home. This creates a lower level that functions as fully livable space — a family room, guest suite, or rental unit — with direct outdoor access and natural light.
Both configurations add significant usable square footage without adding to the above-grade footprint, making them one of the most cost-effective ways to maximize a sloped lot’s potential. For a full breakdown of planning and building this type of space, the walkout basement construction guide covers design options, structural requirements, and cost considerations in detail.
Pier and Grade Beam Foundations
On steep slopes or sites with poor soil bearing capacity, pier and grade beam foundations offer a structurally sound alternative to conventional spread footings.
Piers — either drilled concrete caissons or driven steel piles — are installed deep into stable soil or bedrock, bypassing the unstable upper layers. A grade beam, which is a reinforced concrete beam, spans between the pier tops and supports the structure above.
This system is particularly effective on very steep sites where excavating to a uniform depth would require removing enormous volumes of soil. It is also used when geotechnical reports identify shallow bedrock, expansive soils, or other conditions that make conventional footings impractical.
The cost of pier and beam foundations is typically higher than stepped or conventional foundations, but on the right site, it is the only structurally appropriate choice. A dedicated pier and beam foundation cost breakdown can help you budget accurately before finalizing your foundation selection.
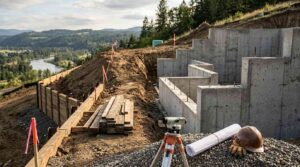
Grading, Excavation, and Retaining Walls
Grading and excavation reshape the land to accommodate the building and manage water. Retaining walls hold that reshaped land in place. Together, these three elements form the structural backbone of any sloped lot project.
Cut and Fill Grading Methods
Grading on a sloped lot involves two complementary operations: cutting (removing soil from high areas) and filling (adding soil to low areas) to create a level or gently sloping building pad.
The goal of a well-designed grading plan is to balance cut and fill volumes as closely as possible. When the volume of soil removed roughly equals the volume needed to fill low areas on the same site, hauling costs are minimized. When cut significantly exceeds fill — or fill significantly exceeds cut — soil must be imported or exported, adding substantial cost.
Cut areas must be compacted and stabilized before construction begins. Fill areas require engineered compaction in lifts — typically 6 to 8 inches at a time — to achieve the bearing capacity needed to support a structure. Improperly compacted fill is one of the leading causes of foundation settlement and structural damage in residential construction.
Retaining Wall Types and When to Use Each
Retaining walls hold back soil at grade changes, preventing erosion and maintaining the level surfaces created by grading. The right wall type depends on the height of the retained soil, the soil conditions, and the loads the wall must resist.
Gravity walls rely on their own mass to resist soil pressure. Concrete block, natural stone, and large-format segmental retaining wall units are common materials. These walls are practical for retained heights up to about 4 feet.
Cantilever walls use a reinforced concrete footing that extends beneath the retained soil, using the weight of the soil itself as a counterbalance. These are engineered walls suited to retained heights of 4 to 10 feet.
Tieback or anchored walls use steel anchors driven into the hillside behind the wall to resist soil pressure. These are used for very tall retained heights or where space constraints prevent the use of a wide footing.
Segmental retaining walls with geogrid reinforcement are a popular residential choice for moderate heights. Layers of geogrid fabric extend back into the fill behind the wall, tying the wall face to a larger mass of reinforced soil.
For a complete breakdown of materials, costs, and engineering requirements, the retaining wall types guide covers every option used in residential construction.
Managing Stormwater Runoff on Sloped Properties
Stormwater management on a sloped lot is not optional — it is a structural requirement. Uncontrolled runoff erodes soil, undermines foundations, saturates fill areas, and can create liability when water flows onto neighboring properties.
A stormwater management plan typically includes a combination of surface swales (shallow channels that direct water around the building), subsurface French drains (perforated pipe in gravel-filled trenches that intercept and redirect groundwater), and catch basins (below-grade collection points that channel concentrated flow to a safe discharge point).
Downspouts from the roof must be directed away from the foundation and connected to the drainage system. Foundation drains — perforated pipe installed at the base of foundation walls — intercept groundwater before it can build up hydrostatic pressure against the wall.

Designing a Home for a Sloped Lot
The most successful sloped lot homes are designed with the terrain, not against it. Forcing a flat-lot floor plan onto a sloped site wastes the site’s natural advantages and drives up construction costs unnecessarily.
Split-Level and Multi-Level Floor Plans
Split-level and multi-level floor plans are the natural design response to sloped terrain. Rather than cutting the entire site to a single elevation, these plans step the living areas down with the grade, keeping excavation minimal and creating a home that feels integrated with its site.
A classic split-level places the main living areas — kitchen, dining, living room — at the entry level, with bedrooms a half-flight up and a family room or garage a half-flight down. This arrangement works well on moderate slopes and creates natural separation between living zones without requiring full staircases between every level.
Multi-level designs on steeper sites may have three or more distinct floor levels, each stepping down the hillside. These homes often have their most dramatic spaces — living rooms, master suites, outdoor decks — at the lowest level, where views are unobstructed and the connection to the landscape is strongest.
For a full exploration of floor plan options suited to sloped terrain, the split-level home floor plans guide covers design configurations, structural considerations, and how each layout performs on different slope types.
When evaluating whether to build a fully custom design or adapt a spec plan to your sloped site, the financial implications are significant — the custom vs spec home comparison breaks down how each approach handles site-specific design challenges, budget flexibility, and long-term resale value so you can make a fully informed decision before breaking ground.
Maximizing Views and Natural Light
One of the most compelling reasons to build on a sloped lot is the view potential. Homes elevated above surrounding terrain or positioned to face open landscapes have a natural advantage that flat-lot homes cannot replicate.
Capturing views requires deliberate orientation. The primary living spaces — kitchen, dining room, living room, and master bedroom — should face the direction of the best views. Large windows, sliding glass doors, and cantilevered decks extend the visual connection between interior spaces and the landscape.
Natural light on a sloped lot follows the same logic. South-facing slopes in the northern hemisphere receive the most direct sunlight throughout the day. Positioning the home to take advantage of solar orientation reduces heating costs in winter and, with proper overhangs, limits solar gain in summer.
Garage Placement and Driveway Design on Slopes
Garage placement and driveway design are practical challenges that sloped lots present in ways flat lots do not. The driveway must navigate grade changes safely, and the garage must be positioned where it can be accessed without creating a dangerously steep approach.
On upslope lots, the garage typically sits at street level with the main living areas above. This is the most straightforward configuration and keeps the driveway grade manageable.
On downslope lots, the garage may be tucked under the main floor at the rear of the home, accessed by a driveway that descends from the street. This configuration requires careful attention to driveway grade — residential driveways should not exceed 12% to 15% slope for safe vehicle access, and steeper grades require special surface treatments for traction.
The sloped driveway construction guide covers materials, grade limits, drainage requirements, and design options for driveways on challenging terrain.
Permits, Zoning, and Building Codes for Sloped Lots
Sloped lot construction typically involves more permitting than flat-lot building. Grading, drainage, retaining walls, and environmental protections all generate their own permit requirements, and these vary significantly by jurisdiction.
Grading Permits and Environmental Regulations
Most jurisdictions require a grading permit for any project that moves more than a specified volume of soil — commonly 50 to 100 cubic yards, though thresholds vary. The grading permit process requires submission of a grading plan prepared by a licensed civil engineer, showing existing and proposed grades, drainage patterns, erosion control measures, and retaining wall locations.
Environmental regulations add another layer on sites near waterways, wetlands, or areas with sensitive habitat. Grading near these features may require environmental impact assessment, agency consultation, or mitigation measures that add time and cost to the project.
Some jurisdictions have specific hillside development ordinances that restrict grading volumes, require minimum lot coverage, or mandate specific slope stabilization methods. Checking with your local planning department before purchasing a sloped lot is essential — these restrictions can significantly limit what is buildable.
Setback Rules and Height Restrictions on Slopes
Standard setback rules — the minimum distances a structure must maintain from property lines — apply on sloped lots just as on flat ones. But slopes introduce additional complications.
Height restrictions on sloped lots are often measured differently than on flat lots. Some jurisdictions measure building height from the average grade around the structure’s perimeter. Others measure from the lowest point of the finished grade adjacent to the building. On a steep slope, these two measurement methods can produce dramatically different allowable building heights, and understanding which method your jurisdiction uses is critical to design planning.
Retaining walls also have their own setback and height restrictions. Walls above a certain height — typically 4 feet — require permits and engineered drawings. Walls near property lines may require neighbor notification or approval.

Cost Breakdown: Building on a Sloped Lot vs. Flat Land
Building on a sloped lot costs more than building on flat ground. The question is not whether costs will be higher, but by how much — and whether the site’s advantages justify the premium.
Where Sloped Lot Costs Are Higher
Grading and excavation are the largest additional cost categories. Moving soil, compacting fill, and creating a stable building pad on a sloped site can cost $10,000 to $50,000 or more depending on slope severity, soil conditions, and the volume of material that must be imported or exported.
Retaining walls add significant cost on sites with substantial grade changes. A basic segmental retaining wall runs $25 to $50 per square foot installed. Engineered concrete walls for taller retained heights can reach $100 to $200 per square foot or more.
Foundation work on steep slopes costs more than standard slab or crawl space foundations. Stepped foundations, pier systems, and daylight basement configurations all require more labor, more concrete, and more engineering than a simple slab pour.
Extended utility runs are common on sloped lots where the building pad is set back from the street or positioned at a different elevation than utility connection points. Longer runs for water, sewer, gas, and electrical service add cost that flat-lot builds rarely encounter.
Driveway construction on steep grades requires more material, better drainage design, and sometimes specialized surface treatments, adding cost compared to a standard flat driveway.
Understanding the full cost picture of sloped lot construction connects directly to a broader financial decision — our custom home investment analysis breaks down how custom builds compare to spec homes across land, design, and construction costs so you can evaluate which path delivers better long-term value for your specific situation.
Where You Can Save Money on a Sloped Build
The land purchase price is often the most significant savings opportunity. Sloped lots in desirable areas frequently sell at a 10% to 30% discount compared to flat parcels with similar location attributes. That discount can offset a substantial portion of the additional construction costs.
Daylight and walkout basements add livable square footage at a lower cost per square foot than above-grade additions. When the slope naturally creates below-grade space, finishing that space as living area is significantly cheaper than building an equivalent addition above grade.
Minimal grading designs — floor plans that follow the natural grade rather than fighting it — reduce excavation and fill costs substantially. Working with an architect experienced in sloped lot design from the beginning of the project is the most reliable way to capture these savings.
Hiring the Right Contractors for Sloped Lot Construction
Sloped lot construction requires contractors with specific experience. General contractors who primarily build on flat lots may underestimate the complexity of sloped site work, leading to budget overruns, scheduling delays, and quality problems.
What to Look for in a Grading and Excavation Contractor
A qualified grading and excavation contractor for sloped lot work should have direct experience with hillside residential projects, not just commercial grading or flat-lot site preparation. Ask to see completed projects on slopes comparable to yours, and speak with the homeowners of those projects about how the contractor handled unexpected conditions.
Verify that the contractor carries adequate liability insurance and workers’ compensation coverage. Grading work on steep slopes carries elevated risk, and inadequate insurance coverage can expose you to significant liability.
Confirm that the contractor works regularly with licensed civil engineers and can coordinate the grading plan, permit submission, and inspection process. On complex sloped sites, the relationship between the grading contractor and the project engineer is critical to keeping the project on track.
Working With Structural Engineers and Architects
A structural engineer is not optional on a sloped lot project — it is a requirement. The engineer designs the foundation system, specifies retaining wall construction, and reviews the grading plan to ensure that the proposed earthwork will not compromise the structure’s stability.
Engage the structural engineer early — ideally before finalizing the floor plan — so that foundation options can inform design decisions rather than constrain them after the fact. An engineer who reviews a completed design and identifies structural problems is far more expensive to work with than one who shapes the design from the beginning.
An architect with sloped lot experience brings a different but equally important perspective. They understand how to position the home on the site to minimize grading, maximize views, and create floor plans that work with the terrain. The combination of an experienced architect and a structural engineer working together from the project’s earliest stages is the most reliable path to a successful sloped lot build.
Landscaping and Outdoor Living on a Sloped Lot
Once the home is built, the sloped lot offers outdoor living and landscaping opportunities that flat lots simply cannot match. Terraced gardens, elevated decks, and tiered outdoor spaces are natural expressions of sloped terrain.
Terracing and Tiered Garden Design
Terracing transforms a steep, difficult-to-use slope into a series of level planting beds and usable outdoor spaces. Each terrace is retained by a low wall — stone, timber, concrete block, or planted earth — and filled with amended soil suitable for planting.
Terraced gardens are highly effective for vegetable gardens, ornamental plantings, and fruit trees because each level can be managed independently. Irrigation is easier to design for level surfaces, and the visual effect of layered plantings on a hillside is one of the most attractive landscape treatments available.
The key to successful terracing is proper drainage between levels. Each terrace must have a way to shed excess water to prevent saturation and wall failure. Perforated pipe behind the retaining walls, combined with gravel backfill, is the standard approach.
For a comprehensive look at plant selection, wall materials, and irrigation design for hillside properties, the hillside landscaping ideas guide covers every element of creating a beautiful and functional sloped landscape.
Deck and Patio Options for Sloped Terrain
Decks are one of the most popular outdoor living additions on sloped lots because they can be built at any elevation above grade, creating level outdoor space where the terrain would otherwise make it impossible.
A grade-level deck on a downslope lot may sit just a few inches above the ground at the uphill side but extend 10 to 20 feet above grade at the downhill edge. This configuration creates dramatic elevated outdoor space with unobstructed views and is one of the signature features of hillside homes.
Multi-level decks step down the slope in two or more platforms, connecting the main living level to the yard below and creating distinct outdoor zones for dining, lounging, and recreation.
Structural requirements for elevated decks on slopes are more demanding than for grade-level decks. Posts must be set on engineered footings that reach stable soil, and the connection between the deck and the house must be designed to handle both vertical loads and lateral forces. A qualified deck builder with hillside experience is essential for this work.
Long-Term Maintenance for Homes Built on Slopes
A home built on a sloped lot requires ongoing attention to the systems that manage water and hold the land in place. Neglecting these systems can lead to expensive structural problems that are far more costly to repair than to prevent.
Monitoring Retaining Walls and Drainage Systems
Retaining walls should be inspected at least once a year and after any significant rain event. Look for signs of movement — leaning, bulging, or cracking — that indicate the wall is under stress. Check that drainage outlets behind the wall are clear and functioning. Blocked drainage is the most common cause of retaining wall failure because it allows water pressure to build up behind the wall face.
Drainage systems — French drains, catch basins, and surface swales — require periodic clearing of debris, sediment, and root intrusion. A drainage system that is partially blocked does not fail immediately; it degrades gradually, and the damage it allows accumulates over time.
Foundation drains should be checked for flow during wet seasons. If a foundation drain that previously discharged water during rain events stops flowing, it may be blocked — a condition that can lead to hydrostatic pressure buildup against the foundation wall.
Erosion Control and Slope Stabilization Over Time
Vegetation is the most effective long-term erosion control on residential slopes. Deep-rooted plants — native grasses, ground covers, shrubs, and trees — bind soil with their root systems and intercept rainfall before it can dislodge surface particles.
Bare soil on a slope is vulnerable. Any area where vegetation has been removed — by construction, landscaping work, or natural die-off — should be replanted or covered with erosion control material promptly. A single heavy rain event on bare slope can move more soil than months of gradual erosion.
Slope stabilization products — erosion control blankets, hydraulic mulch, and bioengineering techniques like live staking — are used to establish vegetation quickly on disturbed slopes. These products hold soil in place while plants establish root systems strong enough to do the job independently.
For a full overview of methods used to protect residential slopes over the long term, the residential erosion control methods guide covers every technique from simple ground cover planting to engineered slope stabilization systems.
Conclusion
Building on a sloped lot demands more planning, more specialized expertise, and more careful attention to site conditions than flat-lot construction — but it rewards that investment with design possibilities, views, and outdoor living spaces that flat land cannot offer.
The decisions made early in the process — site assessment, foundation selection, grading design, and contractor hiring — determine the project’s outcome more than any choices made later. Getting these foundational elements right protects both the structure and the budget.
When you are ready to move forward with your sloped lot project, Mr. Local Services connects you with experienced professionals across every phase of construction — from grading and foundation work to landscaping and long-term maintenance — so your build proceeds with the expertise and reliability it demands.
Frequently Asked Questions
How much more does it cost to build on a sloped lot than a flat lot?
Building on a sloped lot typically costs 10% to 30% more than comparable flat-lot construction, depending on slope severity and soil conditions. The primary cost drivers are grading, retaining walls, and engineered foundations, which flat-lot builds rarely require at the same scale.
Do I need a geotechnical survey before building on a slope?
Yes. A geotechnical survey is essential before building on any sloped lot. It identifies soil bearing capacity, groundwater conditions, and slope stability risks that directly determine which foundation types are safe and what drainage infrastructure is required.
What foundation type is best for a steep sloped lot?
Pier and grade beam foundations are typically best for steep slopes because they reach stable soil or bedrock without requiring massive excavation. Stepped foundations work well on moderate slopes. The right choice depends on soil conditions identified in the geotechnical report.
Can I build a walkout basement on a sloped lot?
Yes, and downslope lots are ideal for walkout basements. The downhill side of the home naturally sits above grade, allowing a full-height door and windows to bring light and outdoor access to the lower level. This adds significant livable square footage at a lower cost per square foot than above-grade additions.
What slope percentage is too steep to build on?
There is no universal threshold, but lots above 30% slope require extensive engineering, significant retaining structures, and specialized construction methods that substantially increase cost and complexity. Some jurisdictions restrict development on slopes above 25% or 30% through hillside development ordinances.
How do I manage water runoff on a sloped lot?
Effective stormwater management combines surface swales, subsurface French drains, catch basins, and foundation drains to intercept and redirect water away from the structure. A civil engineer should design the drainage system as part of the grading plan before construction begins.
Do retaining walls require permits?
In most jurisdictions, retaining walls above 3 to 4 feet in height require a building permit and engineered drawings. Walls near property lines may have additional requirements. Check with your local building department before designing or constructing any retaining wall on a sloped lot.
How long does it take to build on a sloped lot compared to flat land?
Sloped lot construction typically takes 20% to 40% longer than comparable flat-lot projects due to the additional time required for site assessment, grading, foundation work, and drainage installation. Complex sites with steep grades or difficult soil conditions can extend timelines further.
What plants work best for erosion control on a residential slope?
Deep-rooted native grasses, ground covers like creeping juniper and ice plant, and shrubs with fibrous root systems are the most effective erosion control plants for residential slopes. They establish quickly, require minimal maintenance once established, and bind soil more effectively than shallow-rooted ornamentals.


