
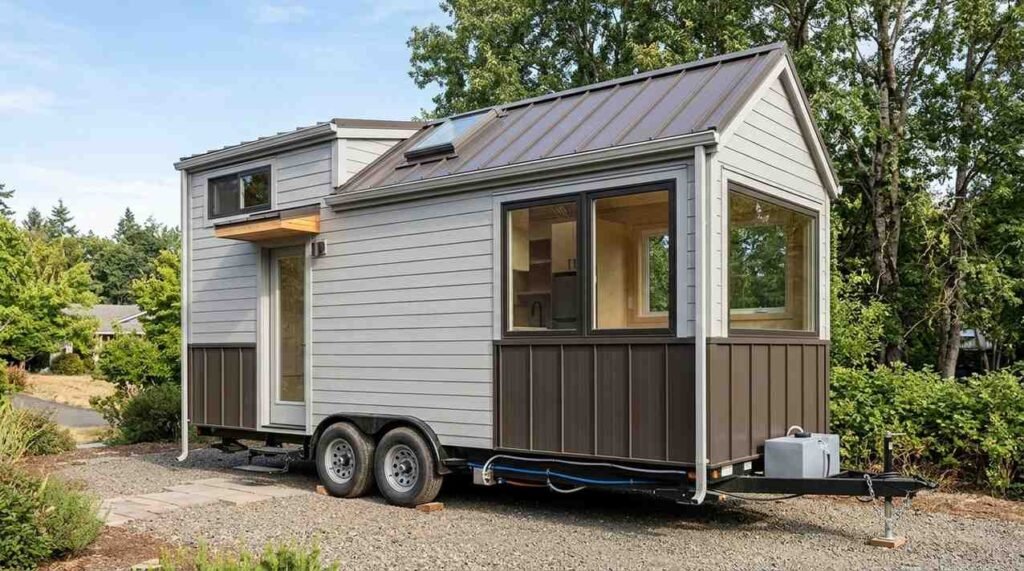
The best materials for building a tiny home on wheels are the ones that stay light, resist moisture, and survive constant road vibration. I’ve watched builds fail for one reason: the wrong material in the wrong layer. Weight and water decide everything here.
Material choices set your towing safety, insurance eligibility, and repair costs for the next twenty years. I treat every decision as a long-term maintenance commitment, not a shopping preference.
This guide walks through trailers, framing, sheathing, siding, roofing, insulation, interior finishes, flooring, windows, mechanical systems, budgets, code requirements, and how to source everything correctly.
What Makes a Material Right for a Tiny Home on Wheels
A tiny home on wheels is a permanent structure sitting on a mobile foundation. That single fact changes every material rule I apply.
I judge each material against three filters: weight per square foot, moisture behavior, and flex tolerance. A material that passes all three earns its place in the build.
Weight Limits and Road Legality
Your trailer’s gross vehicle weight rating sets a hard ceiling. Most tiny house trailers land between 10,000 and 16,000 pounds, and finished builds routinely eat that budget faster than owners expect.
I weigh material choices in pounds per square foot, not dollars per sheet. Standard drywall, tile, and solid hardwood all add hundreds of pounds fast.
Federal road rules also cap your dimensions. The Federal Highway Administration sets a standard 8 feet 6 inches maximum width for travel without special permits, which limits wall thickness and therefore insulation depth.
Vibration, Flex, and Travel Stress
Towing puts your house through an earthquake every time you move. Rigid, brittle materials crack. Flexible, well-fastened materials survive.
I favor materials with mechanical fastening and some give: metal siding over rigid stucco, vinyl plank over ceramic tile, plywood over particleboard.
Adhesives matter as much as the material itself. Construction adhesive plus screws beats screws alone in a structure that shakes.
Moisture, Insulation, and Climate Performance
Small interior volume means high moisture density. Two people cooking and showering in 250 square feet generate serious humidity.
I build every wall assembly around one question: where does water vapor go? Closed-cell foam, proper vapor control, and a ventilated rainscreen answer that question in most climates.
Mold in a tiny home spreads fast because there’s nowhere for it to hide. Getting the moisture layer right prevents the water damage restoration work nobody wants to pay for later.
Trailer and Chassis Materials: The Foundation Layer
Your trailer is the foundation, and it carries every pound above it. I never treat this as the place to economize.
Most purpose-built tiny house trailers use welded steel with a deck-between-the-wheels design that lowers the floor height. That extra headroom matters when you’re capped at 13 feet 6 inches total height.
Steel Trailer Frames
Hot-rolled structural steel dominates the market for good reason. It handles torsion, welds cleanly, and costs less than aluminum for the same strength.
I look for a trailer rated at least 2,000 pounds above my projected finished weight. Overbuilding the chassis is the cheapest insurance in the entire build.
Galvanized and Aluminum Options
Galvanized steel resists rust in coastal and salted-road environments. The zinc coating adds cost upfront and saves years of corrosion repair.
Aluminum trailers cut weight meaningfully but cost significantly more and require specialized welding for repairs. I recommend them for owners who tow frequently across long distances.
Framing Materials: Wood, Steel, and Hybrid Systems
Framing determines your wall thickness, your insulation cavity, and a large share of your total weight. This is the decision most builders regret getting wrong.
I’ve seen all three systems work well. The right answer depends on your climate, your towing frequency, and your comfort with tools.
Softwood Stick Framing
Kiln-dried 2×4 spruce, pine, or fir remains the most common choice. It’s affordable, forgiving, and any carpenter in the country knows how to work with it.
The tradeoff is thermal bridging and moisture vulnerability. Wood studs conduct heat and absorb water, so I always pair stick framing with continuous exterior insulation.
Advanced framing at 24 inches on center reduces both weight and thermal bridging. Skilled carpentry work makes that layout structurally sound rather than merely lighter.
Light-Gauge Steel Framing
Cold-formed steel studs weigh roughly 30% less than comparable dimensional lumber and never rot, warp, or feed termites. That combination appeals to owners in humid or pest-heavy regions.
Steel conducts heat aggressively, so thermal breaks are mandatory rather than optional. I use continuous rigid foam on the exterior face to interrupt that path.
Cutting and fastening steel needs different tools and a learning curve. Budget extra time for a first-time steel build.
SIPs and Advanced Framing Panels
Structural insulated panels combine framing, sheathing, and insulation into one factory-made unit. They deliver excellent airtightness and cut build time dramatically.
The cost runs higher per square foot, and panel modifications on site get complicated. I recommend SIPs for owners prioritizing energy performance over budget flexibility.
Exterior Sheathing and Weather Barriers
Sheathing ties your framing into a rigid box and gives siding something to attach to. It also forms the first line of water defense.
I never skip this layer or substitute thinner material to save weight. The structural racking resistance matters too much on a mobile build.
Plywood vs. OSB Sheathing
Half-inch CDX plywood outperforms OSB in one critical way: it dries after getting wet. OSB swells at the edges and rarely recovers.
I use plywood on tiny homes on wheels almost exclusively. The weight difference is small, and the moisture resilience is worth the modest premium.
House Wrap and Rainscreen Layers
A quality weather-resistant barrier sheds bulk water while letting vapor escape outward. Taped seams and correct shingle-lapping do more than the brand name.
Behind the siding, I install furring strips to create a ventilated rainscreen gap. That air channel dries the assembly and roughly doubles the practical lifespan of wood siding.
Siding Materials Built for Travel
Siding takes highway wind, road debris, and UV exposure that a stationary house never sees. I choose it for durability first and appearance second.
Weight enters the conversation immediately. Every siding option carries a very different pounds-per-square-foot penalty.
Metal Siding and Corrugated Panels
Corrugated steel and aluminum panels are the tiny house default. They’re light, fast to install, fire resistant, and shrug off road debris.
Galvalume-coated steel resists corrosion better than plain galvanized in most climates. I specify a screw pattern with neoprene washers and expect a 40-plus year service life.
The downside is dent vulnerability and thermal expansion noise. Neither issue outweighs the weight savings for most builds.
Wood, Cedar, and Charred Wood Siding
Cedar, cypress, and shou sugi ban charred wood deliver warmth that metal cannot match. They also demand real maintenance.
I plan on refinishing every three to five years depending on sun exposure. Regular exterior painting keeps the coating intact and stops water from reaching the substrate.
Wood adds noticeable weight. On a build already near its GVWR, I use wood as an accent rather than full coverage.
Fiber Cement and Composite Siding
Fiber cement resists fire, insects, and rot exceptionally well. It’s also heavy and brittle, which makes it a poor match for a home that travels often.
Engineered wood composites split the difference. They weigh less than fiber cement, hold paint well, and handle vibration better than cementitious boards.
Roofing Materials for Tiny Homes on Wheels
The roof faces the harshest conditions in the entire build. Sun, hail, branches, and 65 mph highway wind all hit it directly.
I prioritize seamless or mechanically locked systems. Every seam is a future leak waiting for the right vibration.
Standing Seam Metal Roofing
Standing seam is the strongest option available for a tiny home on wheels. Concealed fasteners mean no exposed screw holes to loosen and leak over time.
Metal roofs also handle snow load and shed water fast on the low pitches common to tiny homes. I pair them with a high-temperature underlayment for a genuinely durable assembly.
Professional installation pays for itself here. Precise flashing at penetrations is where most roofing installations succeed or fail.
Membrane and Rolled Roofing Options
TPO and EPDM membranes suit flat or near-flat tiny home roofs. They’re light, seamless across wide spans, and reasonably priced.
I inspect membrane seams annually and reseal penetrations as needed. That small habit prevents the slow leaks that rot a roof deck from above.
Insulation Choices and R-Value Per Inch
Insulation is where tiny homes on wheels differ most from conventional houses. You have four inches of wall cavity, not twelve.
That constraint makes R-value per inch the deciding metric. I choose based on performance density, air sealing, and moisture behavior together.
Closed-Cell Spray Foam
Closed-cell foam delivers roughly R-6 to R-7 per inch while acting as an air barrier, vapor retarder, and structural stiffener simultaneously. That combination is unmatched in a thin wall.
It also glues the assembly together, which reduces racking and rattles during travel. I consider that a real benefit on a mobile structure.
The costs are higher price, professional application, and difficult removal during future repairs. Cavity access disappears once foam cures.
Rigid Foam Boards
Polyiso, XPS, and EPS boards work beautifully as continuous exterior insulation. Polyiso leads at roughly R-6 per inch, though it loses performance in extreme cold.
I use rigid foam outside the sheathing to break thermal bridging across studs. That layer does more for real-world comfort than adding cavity depth.
Mineral Wool, Denim, and Sheep’s Wool
Mineral wool offers around R-4 per inch plus fire resistance and excellent sound damping. It handles moisture without losing performance, which matters in humid climates.
Denim and sheep’s wool appeal to owners avoiding petrochemical products. Both perform adequately and both weigh more than foam.
I pair any batt insulation with meticulous air sealing. Batts stop conduction, not air movement.
Interior Wall, Ceiling, and Finish Materials
Interior surfaces face the same vibration as the exterior, plus daily contact wear. Standard residential finishes often crack within a year of towing.
I select interior materials for weight, flex, and repairability. Small spaces show every flaw.
Plywood and Tongue-and-Groove Paneling
Quarter-inch birch or maple plywood delivers a clean modern finish at a fraction of drywall’s weight. It flexes with the structure instead of cracking against it.
Tongue-and-groove pine and cedar remain the classic tiny house look. The interlocking joints absorb movement naturally.
I seal all interior wood with a low-VOC finish. Air quality matters more in 250 square feet than in 2,500.
Lightweight Drywall Alternatives
Standard half-inch drywall adds roughly 1.6 pounds per square foot and cracks at every seam after a few tows. I avoid it on homes that travel.
Ultralight drywall and quarter-inch panels reduce weight for stationary or rarely-moved builds. Flexible joint compound and fiberglass mesh tape improve crack resistance meaningfully.
Owners who want a true painted finish sometimes accept the tradeoff and plan for periodic drywall and ceiling repair as part of ongoing upkeep.
Flooring Materials That Survive Movement
Floors take structural flex, moisture from entryways, and concentrated point loads from appliances. Rigid brittle flooring fails first.
I build the floor assembly from the subfloor up, and the finish material is the last decision, not the first.
Luxury Vinyl Plank and Sheet Vinyl
Luxury vinyl plank is the most practical tiny house flooring available. It’s waterproof, light, warm underfoot, and floats over minor subfloor movement.
Click-lock installation lets the floor expand and contract without buckling. I leave proper perimeter gaps and skip the glue.
Sheet vinyl offers a seamless waterproof surface in wet zones. Fewer seams means fewer failure points near showers.
Engineered Wood and Cork
Engineered wood gives real wood appearance with better dimensional stability than solid planks. The cross-laminated core resists humidity swings.
Cork adds insulation value and sound damping, which both help in a small hard-surfaced space. It dents under heavy furniture, so I use it away from appliances.
Professional flooring installation matters more here than in a conventional home because the substrate moves.
Windows, Doors, and Sealing Materials
Windows and doors are the largest thermal holes and the most common leak points. On a moving structure, both problems compound.
I spend disproportionately here. Cheap windows undo good insulation instantly.
Vinyl, Aluminum, and Fiberglass Frames
Vinyl frames offer strong thermal performance at moderate cost and weight. They’re the practical default for most tiny home builds.
Aluminum is light and strong but conducts heat badly unless thermally broken. Fiberglass performs best across temperature swings and costs the most.
Dual-pane low-E glass is worth the weight in nearly every climate. I treat single-pane as a non-option. Quality window installation with proper flashing keeps those units performing for decades.
Sealants, Flashing, and Gaskets
Sealant choice separates dry homes from wet ones. I use high-quality polyurethane or silicone rated for building movement, not general-purpose caulk.
Flexible flashing tape at every opening, correctly lapped over the house wrap, does the real work. Sealant is the backup, not the primary defense.
Compression gaskets on doors handle vibration better than adhesive weatherstrip. Correct door installation with an adjustable threshold keeps that seal tight after years of towing.
Plumbing, Electrical, and Mechanical Materials
Mechanical systems in a tiny home on wheels face freeze risk, vibration, and severe space limits. Material choice here prevents the most expensive failures.
I run every line with movement and access in mind. Buried systems become nightmares in a small structure.
PEX, Insulation Wrap, and Freeze Protection
PEX tubing has replaced copper in nearly every tiny home build. It flexes with vibration, tolerates limited freezing without splitting, and installs with fewer joints.
I insulate every run and add heat tape on lines in exposed cavities. Skirting the trailer in cold climates protects the underbelly plumbing.
Expansion tanks and accessible shutoffs make future plumbing repairs far simpler in tight quarters.
Wiring, Panels, and Off-Grid Components
Standard 12-gauge and 14-gauge copper Romex handles most tiny house circuits. Stranded wire performs better than solid in high-vibration areas.
A 30-amp or 50-amp RV-style inlet gives you shore power flexibility. Off-grid builds add solar panels, charge controllers, and lithium battery banks.
Licensed electrical work protects your insurance eligibility and your safety. I never treat this system as a DIY learning project.
Material Budget Ranges and Cost Drivers
Material costs for a tiny home on wheels typically run $25,000 to $60,000 before labor, with the trailer alone consuming $5,000 to $12,000. Finish level drives most of the variance.
Insulation, windows, and siding create the biggest swings. Spray foam and fiberglass windows push you toward the top of the range fast.
I recommend budgeting a 15% contingency for material waste and mid-build changes. Every build I’ve seen needs it.
Codes, Certifications, and Insurance Considerations
Tiny homes on wheels occupy a regulatory gray zone between RVs and permanent dwellings. Your material choices affect which category you land in.
RVIA or NOAH certification requires specific fire-rated materials, egress window sizing, and electrical standards. Certification unlocks insurance, financing, and RV park access.
Appendix Q of the International Residential Code sets standards for tiny houses under 400 square feet, including stair, loft, and ceiling height requirements that influence material dimensions.
Sourcing Materials and Working With the Right Pros
Material quality varies enormously between suppliers, and tiny home builds punish weak products faster than conventional homes. I buy from established building suppliers rather than salvage-only sources for structural components.
Specialty trades matter here. Metal roofing, spray foam, and electrical work all demand licensed professionals with the right equipment.
We connect homeowners with vetted specialists across every trade a tiny home build touches. That coordination saves months of scheduling and prevents the mismatched work that causes leaks.
Conclusion
Material selection for a tiny home on wheels comes down to weight, moisture control, and vibration resistance working together across every assembly layer.
Each system connects to the next, and dedicated guides cover framing, insulation, roofing, and mechanical choices in far greater depth.
We help you find qualified professionals for every stage of your build. Contact Mr. Local Services and get your tiny home project moving today.
Frequently Asked Questions
What is the lightest way to build a tiny home on wheels?
Light-gauge steel framing, rigid foam insulation, metal siding, and vinyl plank flooring create the lightest durable assembly. Avoid drywall, tile, and solid hardwood entirely.
Is wood or steel framing better for a tiny house on wheels?
Steel resists rot and pests while weighing less. Wood costs less and works with common tools. Both perform well with proper thermal breaks and moisture control.
What is the best insulation for a tiny home on wheels?
Closed-cell spray foam delivers the highest R-value per inch plus air sealing and structural stiffness. Rigid foam boards work well as continuous exterior insulation.
Can I use drywall in a tiny house on wheels?
Drywall cracks under towing vibration and adds significant weight. Quarter-inch plywood or tongue-and-groove paneling handles movement far better in mobile builds.
What roofing material lasts longest on a tiny home?
Standing seam metal roofing lasts longest because concealed fasteners eliminate exposed screw holes. It handles highway wind, hail, and snow load reliably.
How much do materials cost for a tiny home on wheels?
Materials typically run $25,000 to $60,000 before labor. The trailer alone costs $5,000 to $12,000, and finish level drives most of the price variation.
Do tiny homes on wheels need certified building materials?
RVIA or NOAH certification requires specific fire-rated and safety-compliant materials. Certification unlocks insurance coverage, financing options, and RV park access.